Yoga Mat Alignment Lines: Using Visual Guides Without Overstretching
Printed or molded yoga-mat markings can offer reference points, but they do not determine the correct pose for every body. Learn how to use guides flexibly while respecting comfort and mobility.
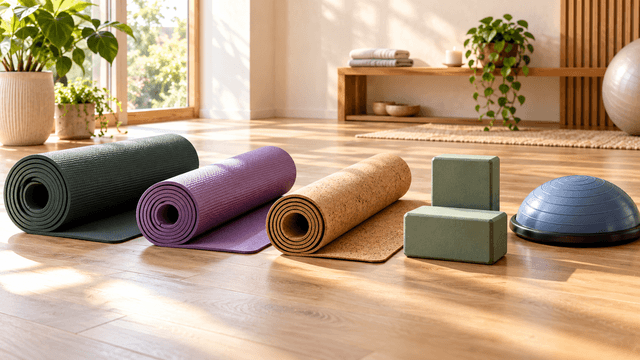
Yoga mats are available in many different designs, from plain exercise mats to textured surfaces with printed alignment markings.
Among these options, yoga mats with alignment lines have become popular with beginners and home practitioners who want visual reference points during their sessions.
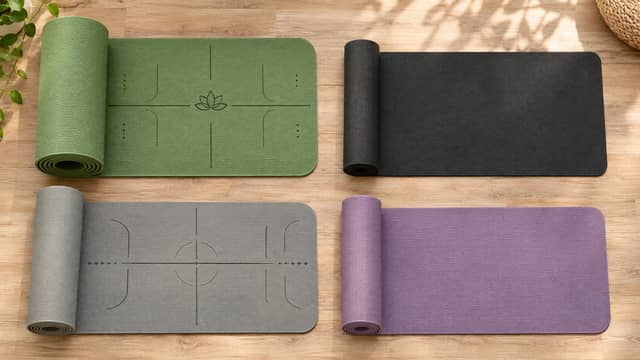
These mats usually feature a central line, horizontal markings, and other geometric patterns intended to help users observe their hand, foot, and body positioning.
However, there is an important distinction between using alignment lines as helpful references and treating them as strict rules.
Yoga mat alignment lines should guide your positioning, not force your body into a predetermined shape.
Every person has different body proportions, joint mobility, flexibility, and movement experience. A position that feels comfortable for one practitioner may not be appropriate for another.
This guide explains how yoga mat alignment lines work, how to use them during common yoga poses, how to avoid overstretching, and what to consider when choosing an alignment mat for home practice.
What Are Yoga Mat Alignment Lines?
Yoga mat alignment lines are printed, embossed, or otherwise incorporated markings on the surface of certain yoga mats.
They are designed to serve as visual references during positioning and movement.
Unlike a completely plain yoga mat, an alignment mat may provide visible guides that make it easier to notice where your hands, feet, or body are placed.
Common markings include:
- A central vertical line
- Horizontal reference lines
- Symmetrical hand-placement markers
- Foot-position guides
- Geometric shapes
- End-point markings
- Additional reference points near the mat’s edges
Not every alignment yoga mat uses the same design.
Some feature a simple central line, while others include detailed geometric patterns.
The purpose of these markings is generally to support positional awareness.
They do not automatically determine whether a yoga pose is anatomically correct.
How Are Alignment Markings Different From Decorative Patterns?
A decorative yoga mat may feature flowers, abstract artwork, or geometric designs primarily for appearance.
An alignment yoga mat uses markings intended to help with positioning.
However, the distinction is not always obvious.
Some decorative patterns resemble alignment guides without being designed for that purpose.
When buying a mat, check whether the manufacturer explains what the markings represent.
A visually attractive pattern does not necessarily provide meaningful positioning information.
Why Do Yoga Mats Have Alignment Lines?
Yoga involves awareness of body position, balance, breathing, and controlled movement.
During home practice, it can be difficult to judge the position of different body parts without external feedback.
For example, you may believe your hands are evenly placed during a tabletop position, while one hand is noticeably farther forward than the other.
Alignment markings can make these differences easier to observe.
1. Helping With Symmetry
A central line may help you notice whether your body is positioned approximately in the middle of the mat.
Horizontal markings can provide a reference when placing your hands or feet.
2. Supporting Position Awareness
Visual guides may help you develop a more consistent starting position during familiar movements.
This can be useful when learning the basic structure of a pose.
3. Making Home Practice More Organized
A practitioner following an instructional video may find it easier to return to similar positions when visible mat references are available.
4. Encouraging Controlled Adjustments
Alignment lines may help you recognize when your stance has shifted.
This can encourage deliberate repositioning rather than hurried or uncontrolled movements.
5. Providing Simple Visual Feedback
Some people find visual references easier to follow than verbal instructions alone.
However, alignment markings cannot replace feedback about joint position, posture, balance, or comfort from an experienced instructor.
Understanding Common Yoga Mat Alignment Markings
Different mats use different visual systems.
The following are common examples.
Central Vertical Line
A central vertical line usually runs along the length of the mat.
It can help you identify the middle of the practice surface.
You may use it as a reference for:
- Standing near the centre of the mat
- Observing the general direction of your body
- Comparing left and right positioning
- Returning to a familiar starting location
However, your feet do not always need to sit directly on this line.
Many poses require a wider stance or offset foot placement.
Horizontal Lines
Horizontal markings run across the width of the mat.
They can help users notice how far forward or backward their hands and feet are positioned.
They may also provide reference points during transitions between poses.
These markings should not dictate an identical hand or foot distance for every practitioner.
Hand-Placement Markers
Some mats include small symbols or lines intended to help users position their hands.
These may be useful during tabletop, plank, or other weight-bearing poses.
However, comfortable hand spacing depends on shoulder width, wrist tolerance, and the movement being performed.
Foot-Placement Markers
Certain mats feature markings intended for standing positions.
These can help users compare the placement of their feet.
However, foot spacing and orientation must still be adjusted for individual anatomy.
Symmetrical Geometric Patterns
Some designs include triangles, circles, or intersecting lines.
These may help users observe visual symmetry.
However, they should not be treated as universal measurements for correct posture.
Do Yoga Mat Alignment Lines Improve Yoga Technique?
Alignment lines may improve awareness of positioning for some practitioners.
However, they do not automatically improve technique.
Correct movement depends on several factors, including:
- Body proportions
- Joint mobility
- Muscle strength
- Balance
- Experience
- Breathing
- Individual physical limitations
- The specific yoga pose
A printed line cannot assess these factors.
For example, two people may place their hands on the same markings during downward-facing dog but experience very different shoulder and hamstring demands.
One person may feel comfortable, while another may need to bend their knees or change hand spacing.
Alignment markings are reference tools, not measurements of individual flexibility or performance.
The goal is to use the markings when helpful and adjust them whenever your body needs a different position.
How to Use Yoga Mat Alignment Lines as a Beginner
If you have never used an alignment mat before, begin with simple movements rather than attempting advanced poses.
Step 1: Place the Mat on a Stable Surface
Choose a flat, suitable floor.
Make sure the mat lies completely flat without curled edges or folds.
Avoid unstable or slippery surfaces.
Follow the manufacturer’s recommendations for the intended floor type.
Step 2: Identify the Main Markings
Look at the central line, horizontal markers, and any other reference points.
If the mat comes with a positioning guide, read it.
Do not assume that every marking has the same purpose across different brands.
Step 3: Stand Comfortably Near the Centre
Begin in a relaxed standing position.
Use the central line to recognize where you are on the mat.
Your feet should remain in a natural, comfortable position rather than being forced onto a particular line.
Step 4: Try Simple Body Positions
Start with beginner-friendly positions such as standing, tabletop, or a comfortable kneeling posture.
Observe how the markings relate to your body.
Step 5: Adjust for Your Proportions
If a printed reference point requires you to stretch farther than feels comfortable, do not follow it rigidly.
Adjust your hands or feet.
Your body does not need to match a generic diagram.
Step 6: Move Slowly
Avoid making abrupt changes simply to reach a marking.
Use controlled movements and steady breathing.
Step 7: Treat Discomfort as Feedback
A stretch may create a gentle sensation of tension, but sharp pain, pinching, numbness, dizziness, or instability should not be ignored.
Stop or modify the position when necessary.
Using Alignment Lines in Mountain Pose
Mountain Pose, commonly known as Tadasana, is a basic standing yoga posture.
Although it may look simple, it can help practitioners develop awareness of standing balance.
How the Alignment Mat Can Help
The central line provides a visual reference for positioning your body along the length of the mat.
You can observe whether your stance is comfortably centered.
Practical Steps
- Stand near the centre of the mat.
- Place your feet in a comfortable position.
- Distribute your weight naturally across both feet.
- Keep your knees comfortable rather than forcing them backward.
- Allow your shoulders to relax.
- Maintain steady breathing.
The line is not a requirement to keep both feet touching.
Different practitioners may prefer slightly different foot spacing.
Common Mistake: Forcing the Feet Together
Some people assume that placing their feet directly against each other automatically produces better alignment.
However, forcing an uncomfortable stance may reduce stability.
Better approach: Use a comfortable standing position and treat the central line as an orientation reference.
Using Alignment Lines in Tabletop Pose
Tabletop Pose is commonly used in beginner yoga sessions.
It involves supporting the body on the hands and knees.
An alignment mat can help users observe whether the hands and knees are positioned approximately where intended.
How the Markings Can Help
Horizontal lines can provide reference points for hand placement.
The central marking may help you notice whether your body has shifted to one side.
Practical Steps
- Begin on your hands and knees.
- Position your hands in a comfortable relationship to your shoulders.
- Place your knees at a comfortable width.
- Keep your neck in a natural position.
- Distribute pressure comfortably.
- Adjust your hands or knees as needed.
Avoid Forcing Wrist Position
Some people experience discomfort when placing their wrists in a fully extended, weight-bearing position.
Do not force the hands onto printed markers if that causes pain.
A suitable modification or alternative position may be more appropriate.
People with existing wrist conditions should seek appropriate guidance before performing weight-bearing poses.
Using Alignment Lines in Downward-Facing Dog
Downward-Facing Dog, or Adho Mukha Svanasana, is one of the most recognizable yoga poses.
It involves placing the hands and feet on the mat while lifting the hips.
This position can place demands on the shoulders, wrists, calves, and hamstrings.
How Alignment Lines Can Help
The markings may help you observe:
- Whether your hands are placed approximately evenly
- Whether one hand is farther forward
- Whether your feet have shifted unexpectedly
- Whether you have moved toward one side of the mat
However, the markings cannot determine your ideal hand-to-foot distance.
That distance depends on individual proportions, mobility, and comfort.
A Practical Approach
- Begin in an appropriate starting position.
- Place your hands comfortably on the mat.
- Adjust the feet according to the pose and your ability.
- Lift your hips gradually.
- Keep your breathing steady.
- Bend your knees if needed to maintain comfort.
- Avoid forcing your heels to touch the floor.
- Exit the pose if you experience pain or instability.
Common Mistake: Forcing the Heels Down
Some beginners believe that their heels must reach the floor to perform the pose correctly.
However, ankle flexibility and hamstring mobility vary.
Forcing the heels down may create unnecessary tension.
Better approach: Allow the heels to remain raised when necessary.
Common Mistake: Overstretching to Match the Lines
A tall practitioner and a shorter practitioner may require different distances between the hands and feet.
Do not assume that both should use identical printed markings.
Using Alignment Lines in Plank Pose
Plank Pose is a weight-bearing position that requires strength and control.
Alignment markers may help users observe general positioning.
However, the pose should not be attempted solely by matching the mat’s printed design.
How the Mat Can Help
Horizontal markers may help you notice whether your hands are placed unevenly.
The central line may provide a reference for maintaining a consistent direction.
Practical Positioning
When performing an appropriate plank variation:
- Place your hands in a comfortable position.
- Follow suitable guidance regarding shoulder and wrist alignment.
- Keep the body controlled.
- Avoid allowing the lower back to sag excessively.
- Maintain steady breathing.
- Use a modified plank when needed.
When to Modify
A knees-down plank may be more appropriate for some beginners.
People with wrist, shoulder, or back problems may need additional modifications or a different exercise.
The alignment lines should not encourage you to continue holding a painful position.
Using Alignment Lines in Warrior II
Warrior II, or Virabhadrasana II, is a standing pose involving a wider stance.
It requires attention to balance, hip position, knee comfort, and foot orientation.
How the Markings Can Help
The central line may serve as an orientation reference.
Horizontal markings can help users notice differences between front and back foot positions.
However, the precise stance depends on the individual.
Practical Considerations
When practicing Warrior II under appropriate instruction:
- Establish a stable stance.
- Position the front and back feet comfortably.
- Bend the front knee to a depth you can control.
- Maintain comfortable hip and knee alignment.
- Keep the upper body steady.
- Adjust the stance when needed.
Common Mistake: Forcing a Wider Stance
Some practitioners try to extend their feet as far apart as possible.
This may be uncomfortable or difficult to control.
Better approach: Choose a stance that supports balance and controlled movement.
Common Mistake: Treating the Mat as a Universal Foot Diagram
Printed foot markers may be useful for orientation but may not suit your body proportions.
Adjust the position rather than forcing your feet onto fixed markings.
Using Alignment Lines in Low Lunge
Low Lunge is another pose where a visual reference may be useful.
The position generally involves one leg forward and the other positioned behind.
How the Mat Can Help
A central line may help you observe whether your body is leaning unusually to one side.
Other markings may provide reference points for positioning your hands.
Practical Considerations
- Begin slowly.
- Use an appropriate stance.
- Maintain balance.
- Avoid forcing the front knee or back hip into an uncomfortable range.
- Use yoga blocks or other suitable support if needed.
- Reduce the depth of the pose when necessary.
Avoid Overstretching the Hip Flexors
Some practitioners attempt to push deeply into the lunge to increase the stretch.
However, more depth is not automatically better.
A controlled, comfortable position is preferable to forcing the body beyond its current range.
Using Alignment Lines in Seated Yoga Poses
Alignment markings may also help during seated positions.
However, the importance of the lines is often different from standing poses.
Seated Forward Fold
In a seated forward fold, the central line may help orient the legs along the mat.
However, it should not encourage you to pull your torso toward a printed point.
Bending the knees or using suitable props may improve comfort.
Easy Pose
During a comfortable cross-legged position, the central line may provide orientation.
However, hip mobility differs significantly between people.
Use appropriate support when needed.
Seated Twists
A visual reference may help you notice general posture, but it cannot determine a safe twisting range.
Avoid forcing rotation through the spine.
Move gently and stop if the position causes pain.
Why Body Proportions Matter More Than Printed Markings
One of the most important limitations of alignment mats is that they use fixed markings.
Human bodies do not have fixed proportions.
Two people of the same height may have different:
- Arm lengths
- Leg lengths
- Torso lengths
- Shoulder widths
- Hip structures
- Foot sizes
- Joint mobility
- Flexibility levels
These differences influence how poses feel and how people position themselves.
Example: Hand Placement
A person with broad shoulders may need greater hand spacing than someone with narrower shoulders.
A standard printed marker cannot accommodate every body.
Example: Foot Distance
Two practitioners may need different stance lengths to maintain comfortable balance.
Example: Forward Folding
A person with relatively long legs and a shorter torso may experience a pose differently from someone with different proportions.
Example: Shoulder Mobility
Certain overhead or weight-bearing positions may feel very different depending on shoulder mobility.
The markings can help you see where you are positioned, but they cannot tell you exactly where your body should be.
This distinction is central to using an alignment mat safely.
How to Avoid Overstretching During Yoga
Overstretching occurs when a movement pushes a joint, muscle, or other tissue beyond a range that is appropriate or comfortable for the individual.
It can occur during yoga when someone prioritizes achieving a particular shape over maintaining control.
1. Do Not Chase the Printed Lines
If a reference point requires excessive stretching, ignore it.
The mat should adapt to your practice, not determine your physical limits.
2. Move Into Poses Gradually
Avoid bouncing or forcing the body into a stretch.
Use slow, controlled movement.
3. Maintain Comfortable Breathing
If you find yourself holding your breath because a pose feels overwhelming, reduce the intensity.
Breathing alone is not a complete safety test, but it can be useful feedback.
4. Distinguish Stretching From Pain
A mild stretching sensation may be expected in some poses.
Sharp pain, joint pinching, numbness, or an unstable feeling should not be treated as normal.
Stop or modify the movement.
5. Use Yoga Props When Needed
Blocks, straps, folded blankets, and other appropriate supports may make certain positions more accessible.
Use them according to suitable instructions.
6. Respect Your Current Mobility
Flexibility varies from day to day.
Fatigue, previous activity, and other factors can influence how a pose feels.
Do not force yourself to match yesterday’s range of motion.
7. Avoid Comparing Yourself With Others
The ability to match a visual position does not establish the quality or safety of a yoga practice.
A comfortable modification may be more appropriate than a deeper version of the pose.
What Happens When You Force Yoga Alignment?
Forcing alignment can create unnecessary stress on muscles, tendons, ligaments, and joints.
The exact risks depend on the position and individual circumstances.
Potential warning signs include:
- Joint discomfort
- Sharp stretching pain
- Loss of balance
- Excessive wrist pressure
- Knee discomfort
- Shoulder pinching
- Lower-back strain
- Numbness or tingling
These symptoms should not be ignored.
Stop the movement and consider a suitable modification.
Seek professional advice for persistent pain, existing injuries, or unexplained symptoms.
Alignment lines should never encourage someone to continue a movement that causes significant discomfort.
Are Alignment Yoga Mats Good for Beginners?
Alignment mats can be useful for beginners who appreciate visual reference points.
They may make it easier to observe hand placement, foot placement, and general positioning during basic poses.
However, beginners should understand their limitations.
Potential Benefits for Beginners
- Clear visual references
- Easier recognition of the mat’s centre
- More consistent starting positions
- Assistance during simple home practice
- Convenient references while following instructional videos
Important Limitations
- Lines cannot evaluate posture.
- Markings do not account for every body type.
- A visually symmetrical position is not always the most comfortable.
- The mat cannot identify unsafe joint loading.
- It cannot replace appropriate instruction.
A beginner should prioritize learning safe, controlled movement rather than trying to match every marking perfectly.
Are Alignment Mats Useful for Experienced Practitioners?
Experienced yoga practitioners may also find alignment markings convenient.
For example, visual references can help with consistent positioning during familiar sequences.
However, experienced practitioners may rely more on body awareness and individualized adjustments.
Some may prefer plain mats because they find printed lines distracting.
Neither preference is inherently better.
An alignment mat is a tool that may support a practice, not a requirement for progress.
Alignment Yoga Mat vs Plain Yoga Mat
Both types can support yoga practice.
Their main difference is the presence or absence of visual positioning markings.
| Feature | Alignment yoga mat | Plain yoga mat |
|---|---|---|
| Surface markings | Usually includes reference lines | Usually no instructional markings |
| Visual positioning assistance | Available | Relies on other cues |
| Beginner convenience | May help with orientation | Also suitable for beginners |
| Body-size adaptability | Markings remain fixed | No fixed positioning cues |
| Grip | Depends on material and texture | Depends on material and texture |
| Cushioning | Depends on thickness and construction | Depends on thickness and construction |
| Portability | Depends on dimensions and weight | Depends on dimensions and weight |
| Price | Varies by product | Varies by product |
An alignment mat is not automatically superior to a plain mat.
Grip, comfort, material, durability, and suitability for your practice may be more important than printed markings.
Does Yoga Mat Thickness Affect Alignment?
Yoga mat thickness influences how the surface feels during practice.
It can affect cushioning and the sensation of stability.
However, thickness and alignment markings serve different purposes.
Thinner Mats
Some practitioners prefer thinner mats because they provide a firmer connection with the floor.
However, a thin mat may feel less comfortable during prolonged kneeling.
Medium-Thickness Mats
A medium-thickness mat may offer a balance between cushioning and stability.
Suitability depends on the material and the person’s preferences.
Thicker Mats
Thicker mats may provide additional cushioning.
However, certain soft or compressible mats may feel less stable during standing balance poses.
What About an 8 mm Alignment Yoga Mat?
An 8 mm mat may provide noticeable cushioning depending on its material and density.
However, thickness alone does not determine grip, comfort, or quality.
A dense 8 mm mat may behave differently from a softer mat of the same thickness.
Choose thickness according to your intended movements, floor surface, and comfort needs.
Do Alignment Lines Affect Yoga Mat Grip?
Alignment lines do not automatically improve traction.
Grip depends primarily on the mat’s surface material, texture, condition, and interaction with the floor and user.
Some mats have printed markings that sit on the surface.
Others integrate markings into the material.
In certain designs, the markings may feel slightly different from the surrounding mat.
Check the Surface
The mat should provide suitable traction for the movements you intend to perform.
Keep the Mat Clean
Sweat, oils, dust, and product residue may affect grip.
Follow the manufacturer’s cleaning instructions.
Consider the Floor Surface
A mat may grip differently on tiles, laminate, wood, or other flooring.
Check that the mat remains stable.
Avoid Relying on Printed Lines for Safety
A mat with detailed alignment graphics can still be slippery.
Visual guidance and physical traction are separate features.
How to Choose an Alignment Yoga Mat for Home Practice
If you are considering purchasing an alignment mat, evaluate the complete product rather than focusing only on the printed design.
1. Mat Length
Choose a mat that provides sufficient room for your height and intended movements.
Taller users may prefer longer mats.
2. Mat Width
A wider mat may provide more space for certain standing and floor-based movements.
However, additional width can also affect portability and storage.
3. Thickness
Consider your preferred balance between cushioning and stability.
4. Material
Yoga mats are made from materials such as TPE, PVC, natural rubber, and other compounds.
Each has different characteristics.
Check the manufacturer’s material information and care instructions.
5. Surface Grip
Consider how the mat performs during the movements you plan to practice.
Do not assume that alignment lines guarantee slip resistance.
6. Marking Visibility
Choose markings that are easy to see without becoming distracting.
Very faint lines may be less useful in low light.
7. Printing Durability
Some surface markings may fade with repeated friction or cleaning.
Check the care instructions and product information.
8. Portability
Consider the mat’s weight, rolling behaviour, and storage requirements.
9. Cleaning Requirements
Some materials require specific cleaning products or techniques.
Choose a mat you can maintain properly.
10. Overall Value
A higher price does not automatically mean better alignment guidance.
Consider the full combination of size, material, grip, comfort, durability, and manufacturer support.
How to Clean a Yoga Mat Without Damaging Alignment Lines
Regular cleaning helps remove sweat, dirt, and other surface residue.
However, some printed markings may be sensitive to unsuitable cleaning methods.
Step 1: Read the Care Instructions
Different yoga mat materials require different cleaning methods.
Follow the manufacturer’s directions.
Step 2: Remove Loose Dirt
Use an appropriate soft cloth to remove surface dust.
Avoid rough scrubbing tools.
Step 3: Clean With an Approved Method
If permitted, wipe the mat using a suitable lightly dampened cloth and the cleaning solution recommended by the manufacturer.
Avoid soaking the mat unless specifically instructed.
Step 4: Pay Attention to Printed Areas
Do not scrub alignment markings aggressively.
Repeated abrasion may cause certain surface prints to fade.
Step 5: Remove Cleaning Residue as Directed
Some cleaning products require additional wiping.
Follow the instructions.
Step 6: Allow the Mat to Dry Completely
Dry the mat in a suitable well-ventilated location.
Avoid direct high heat.
Step 7: Store Only When Dry
Rolling a damp mat may trap moisture.
Allow it to dry fully before storage.
Do not use bleach, strong solvents, or household chemicals unless the manufacturer confirms that they are suitable.
How to Store an Alignment Yoga Mat
Proper storage helps protect the mat’s surface and maintain its usability.
Roll According to the Manufacturer’s Directions
Some mats have a preferred rolling orientation.
Follow the product’s guidance.
Avoid Tight Folding
Folding a mat not designed to fold may create creases or damage its structure.
Keep Away From Excessive Heat
Do not leave the mat in a hot car or directly beside heating equipment.
Avoid Long-Term Direct Sunlight
Certain materials and printed markings may deteriorate with prolonged sunlight exposure.
Store in a Dry Location
Avoid storing a damp mat in a closed bag.
Keep Away From Sharp Objects
Sharp equipment or rough edges may damage the mat’s surface.
Inspect Before Reuse
Check for curled edges, peeling, tears, or other changes that may affect safe use.
Common Mistakes When Using Yoga Mat Alignment Lines
Mistake 1: Treating Every Marking as a Rule
A printed reference point may not suit your proportions.
Better approach: Use the line for orientation and adjust for comfort.
Mistake 2: Forcing Hands Into Fixed Positions
Hand spacing depends on the pose, body proportions, and joint comfort.
Better approach: Choose suitable placement rather than matching a marking mechanically.
Mistake 3: Overstretching to Reach a Line
Trying to touch a particular marker can encourage excessive movement.
Better approach: Respect your current range of motion.
Mistake 4: Ignoring Pain
Pain is not a sign that the pose is more effective.
Better approach: Stop or modify movements that cause pain.
Mistake 5: Assuming Symmetry Means Correctness
Bodies are not perfectly symmetrical, and visually equal placement is not always ideal.
Better approach: Focus on balanced, controlled, comfortable movement.
Mistake 6: Ignoring Mat Grip
Alignment graphics do not prevent slipping.
Better approach: Check the mat’s traction and floor stability.
Mistake 7: Comparing Foot Placement With Others
Different practitioners may need different stance lengths and widths.
Better approach: Use individualized positioning.
Mistake 8: Choosing a Mat Only for Its Design
Attractive graphics do not guarantee suitable quality.
Better approach: Evaluate material, grip, size, and comfort.
Mistake 9: Scrubbing the Printed Lines Aggressively
Rough cleaning can damage some markings.
Better approach: Follow the manufacturer’s cleaning instructions.
Mistake 10: Practicing Advanced Poses Without Appropriate Preparation
Alignment markings cannot replace strength, mobility, balance, or instruction.
Better approach: Progress gradually and seek qualified guidance when needed.
A Simple 15-Minute Alignment Mat Familiarization Routine
If you are new to alignment mats, begin with a short, comfortable session focused on observing the markings.
This is an example of a gentle familiarization routine, not a prescribed exercise program.
Minutes 1–3: Explore the Mat
Place the mat on a stable surface.
Identify the central line and other markings.
Stand comfortably and observe your position.
Minutes 4–6: Comfortable Standing Practice
Use a simple standing posture to become familiar with the central reference line.
Maintain steady breathing.
Avoid forcing your feet into an uncomfortable position.
Minutes 7–9: Tabletop Position
If appropriate for your physical condition, move into a comfortable tabletop position.
Observe the hand and knee references.
Adjust as needed for wrist and knee comfort.
Minutes 10–12: Gentle Position Changes
Practice slow, familiar transitions appropriate for your ability.
Observe how the markings can help you return to a starting position.
Avoid forcing an unfamiliar pose.
Minutes 13–15: Relaxation and Review
Return to a comfortable seated or resting position.
Notice which markings helped your awareness and which were unnecessary.
The goal is to become familiar with the tool, not to achieve a particular flexibility target.
If you have existing injuries, mobility limitations, or a medical condition affecting exercise, consult an appropriate professional before beginning a new practice.
When Should You Ignore Yoga Mat Alignment Lines?
There are several situations where ignoring a marking is the better choice.
When a Position Causes Pain
Do not remain in a painful position simply because your hands or feet match a printed guide.
When Your Body Proportions Require Different Spacing
Adjust stance length, width, or hand placement according to your needs.
When a Modified Pose Works Better
Props and modified postures may make movement more comfortable.
Use the modification rather than forcing the standard printed reference.
When the Markings Become Distracting
If focusing on the lines interferes with controlled movement or breathing, stop relying on them.
When an Instructor Recommends Individualized Alignment
Qualified instruction based on your body and circumstances may be more appropriate than a generic mat design.
The markings should support your practice, not control it.
Frequently Asked Questions
1. What are alignment lines on a yoga mat?
They are visual markings intended to help users observe positioning during yoga.
They may include central lines, horizontal guides, and hand or foot markers.
2. Are alignment yoga mats good for beginners?
They can be useful for beginners who appreciate visual references.
However, they do not replace appropriate instruction or individualized positioning.
3. Do yoga mat alignment lines improve flexibility?
Alignment lines do not directly increase flexibility.
They may help with positional awareness, but flexibility depends on several factors.
4. Should my feet always match the printed markings?
No.
Foot placement depends on your body proportions, mobility, balance, and the specific pose.
5. Can alignment lines prevent yoga injuries?
No mat markings can guarantee injury prevention.
Appropriate technique, controlled movement, suitable equipment, and individual limitations remain important.
6. Are alignment mats better than plain mats?
Not necessarily.
Both can support yoga practice.
The better choice depends on your preferences and the mat’s overall qualities.
7. Can I use an alignment mat for Pilates?
Some alignment mats may also be suitable for Pilates or general floor exercises.
Check whether the mat provides appropriate grip, cushioning, and dimensions for your intended activity.
8. Do alignment markings work for tall people?
They may provide useful references, but their fixed spacing may not suit every tall practitioner.
A longer mat and individualized positioning may be more important.
9. Are yoga mat alignment lines scientifically proven to correct posture?
A printed alignment system should not be assumed to correct posture automatically.
Claims about specific benefits require appropriate evidence.
10. Can I practice yoga without alignment lines?
Yes.
Many people practice effectively on plain yoga mats.
Alignment markings are optional.
11. What is the central line used for?
It generally provides an orientation reference along the mat’s length.
Its specific intended use depends on the manufacturer’s design.
12. Should my hands always be shoulder-width apart?
Hand placement depends on the particular pose and individual anatomy.
Follow suitable instruction and adjust for comfort.
13. Can alignment mats help with balance?
Visual references may help some people observe their positioning.
However, balance depends on multiple physical and neurological factors.
14. Do thicker alignment mats provide better support?
Not automatically.
Thickness, density, material, and stability all influence comfort.
15. Can alignment markings wear off?
Yes.
Certain surface prints may fade or deteriorate with friction, cleaning, and use.
Follow the manufacturer’s care instructions.
16. Can I wash an alignment yoga mat?
Many mats can be cleaned, but the correct method depends on their materials and construction.
Follow the manufacturer’s instructions.
17. Is an 8 mm yoga mat suitable for beginners?
An 8 mm mat may provide comfortable cushioning for some people.
However, suitability depends on density, stability, movement type, and individual preferences.
18. Should I force my heels onto the mat during downward-facing dog?
No.
Avoid forcing a range of motion that causes discomfort.
Heel position varies with mobility and individual anatomy.
19. Can alignment lines replace a yoga instructor?
No.
They provide visual references but cannot assess movement quality, pain, stability, or individual physical limitations.
20. Is an alignment yoga mat necessary for home yoga?
No.
It may be a useful accessory, but a suitable plain mat can also support home practice.
Final Yoga Mat Alignment Checklist
Before and during practice, review these points:
- Place the mat on a stable, suitable floor.
- Check that the surface is clean and dry.
- Identify the central and horizontal markings.
- Read the manufacturer’s explanation of the alignment design.
- Treat markings as references rather than strict rules.
- Adjust hand and foot placement for your proportions.
- Avoid forcing a position to match a line.
- Maintain controlled movements.
- Respect your current flexibility and mobility.
- Avoid pushing through pain.
- Use appropriate modifications or props when needed.
- Check wrist, knee, shoulder, and hip comfort.
- Avoid excessive stretching during transitions.
- Pay attention to grip and floor stability.
- Clean the mat according to its instructions.
- Allow the mat to dry completely before storage.
- Inspect the mat for wear or damage.
- Seek qualified guidance when necessary.
Final Thoughts
Yoga mat alignment lines can be helpful tools for improving awareness of where your hands, feet, and body are positioned during practice.
For beginners, they may provide simple visual references that make certain starting positions easier to understand.
Experienced practitioners may also find them convenient for maintaining consistent orientation during familiar sequences.
However, alignment markings have an important limitation.
They are fixed patterns printed on a surface, while human bodies vary in proportions, mobility, strength, and comfort.
A position that matches the mat perfectly is not automatically the safest or most appropriate position for every person.
This is why alignment lines should be treated as flexible guides rather than instructions that must be followed exactly.
Choose hand and foot placements that suit your body, move gradually, avoid forcing stretches, and use modifications when necessary.
When selecting a yoga mat, consider grip, cushioning, size, material, and durability alongside the visual design.
A mat with attractive alignment graphics is not necessarily better than a plain mat that offers reliable comfort and stability.
Ultimately, successful yoga practice is not about matching every printed line.
It is about developing controlled movement, body awareness, comfortable positioning, and a sustainable practice.
Use the markings when they help. Ignore them when they do not. Your body’s needs should always take priority over the design of the mat.
Physical Glow editorial note: This article provides general yoga equipment and movement information. Yoga poses and physical abilities vary, and this content does not replace guidance from a qualified instructor or healthcare professional. Stop movements that cause pain, and seek appropriate advice if you have an existing injury, joint condition, or other medical concern.