Adjustable Hand Grippers: How to Choose Resistance, Handle Fit and Progression
Understand hand-gripper spring adjustment, handle spacing, grip comfort and how to increase resistance without relying on unverified resistance labels.
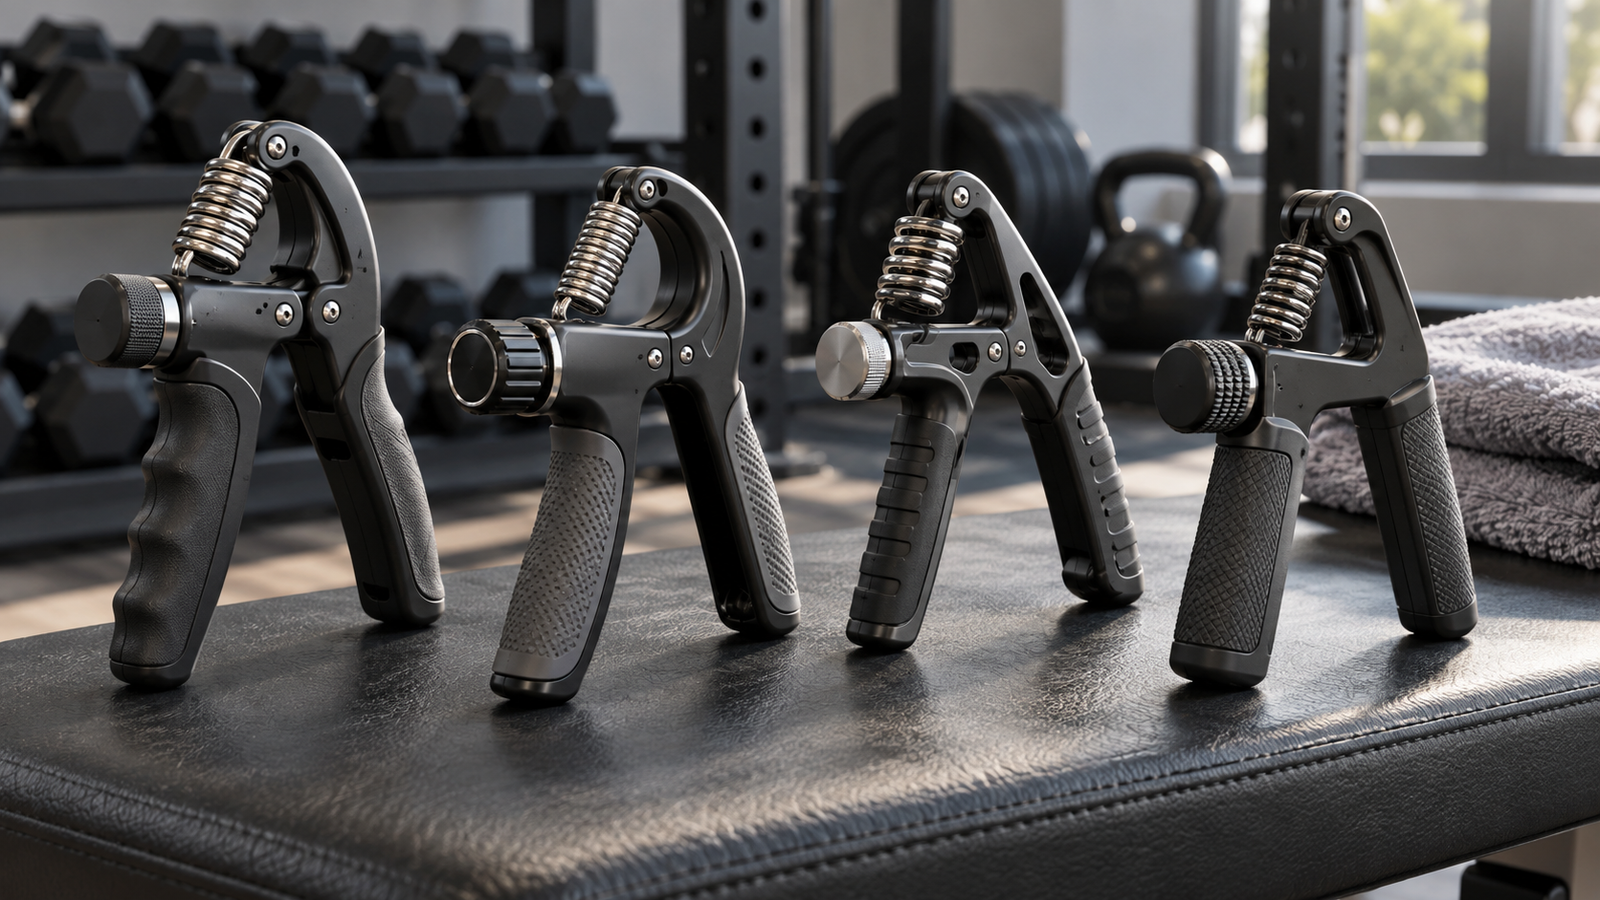
Adjustable hand grippers are simple strength tools, but choosing one is not just about buying the model with the highest resistance number.
A gripper should fit your hand comfortably, offer a resistance range you can actually use with good form and allow gradual progression over time.
The best choice depends on your current grip strength, hand size, training goal and how precisely the gripper’s resistance mechanism can be adjusted.
What is an adjustable hand gripper?
An adjustable hand gripper is a spring-loaded tool designed to strengthen the muscles involved in gripping.
Most models have:
- Two handles.
- A spring mechanism.
- An adjustment dial or movable spring position.
- A stated resistance range.
By squeezing the handles together, you train the fingers, hand and forearm muscles involved in closing the grip.
Some models allow very small resistance changes, while others provide only a broad adjustment range.
What muscles do hand grippers train?
Hand grippers mainly challenge the muscles responsible for closing the fingers and gripping.
Training can involve:
- Finger flexors.
- Forearm flexor muscles.
- Hand intrinsic muscles.
- Thumb support muscles.
- Wrist stabilisers.
The exact loading depends on the gripper design and how you hold it.
A gripper is primarily a crushing-grip tool. It does not train every type of hand strength equally.
What is crushing grip?
Crushing grip is the ability to close the fingers against resistance.
Examples include:
- Squeezing a gripper.
- Holding a firm handshake.
- Crushing a soft object in the hand.
Other grip-strength categories include:
- Support grip.
- Pinch grip.
- Open-hand grip.
A hand gripper is useful, but it is not a complete grip-training programme by itself.
Why adjustable resistance is useful
A fixed-resistance gripper gives you only one difficulty level.
An adjustable gripper lets you:
- Start at a lower resistance.
- Increase gradually.
- Use different resistance for warm-up and working sets.
- Train both hands separately.
- Progress without immediately buying another gripper.
This is especially useful for beginners.
However, the adjustment system should be easy to use and stable during exercise.
What does the resistance number mean?
Manufacturers often list resistance in kilograms or pounds.
Examples may include ranges such as:
- 5–20 kg.
- 10–40 kg.
- 10–60 kg.
These numbers can be useful, but they should not be treated as perfectly standardised across different products.
The actual feel may vary because of:
- Spring design.
- Handle length.
- Handle spacing.
- Where the spring is positioned.
- How the resistance was measured.
Two grippers both labelled “30 kg” may not feel identical.
Why you should not buy by the maximum number alone
A high maximum resistance can look impressive, but it is not automatically more useful.
If you currently train comfortably at a low resistance, buying a gripper with an extremely stiff starting level may make progression difficult.
A practical range is more valuable than a very high maximum you cannot use.
The right question is:
Does this gripper cover the resistance range I can train with now and progress through later?
Adjustable hand gripper vs fixed gripper
| Factor | Adjustable gripper | Fixed gripper |
|---|---|---|
| Resistance levels | Multiple | One |
| Beginner progression | Easier | Requires buying new grippers |
| Convenience | High | High |
| Resistance consistency | Depends on mechanism | Often simpler |
| Portability | Excellent | Excellent |
| Mechanical complexity | Higher | Lower |
| Best for | General progression | Specific strength levels |
Who can benefit from an adjustable gripper?
Adjustable grippers can be useful for:
- Beginners.
- Strength trainees.
- Climbers.
- Racquet-sport players.
- People who want stronger hands for daily tasks.
- Lifters who want extra grip work.
They can also be used as part of some rehabilitation programmes, but injury rehabilitation should be guided by an appropriate healthcare professional.
How to choose the right resistance range
Start with your current ability.
A useful training resistance should allow you to:
- Close the gripper with control.
- Complete several repetitions.
- Avoid excessive wrist movement.
- Avoid pain.
- Maintain similar technique from the first repetition to the last.
If you cannot move the handles through a meaningful range, the resistance is probably too high.
If you can perform a very large number of repetitions without fatigue, it may be too low for strength-focused training.
Beginner resistance
Beginners usually benefit from starting lighter than they expect.
The goal is to learn:
- Proper handle placement.
- Controlled squeezing.
- Full-range repetitions.
- Gradual progression.
There is little benefit in starting with a gripper that you can barely move.
Intermediate resistance
Once you can perform controlled sets at a lower level, gradually increase the resistance.
Progression should be small enough that you can maintain technique.
Avoid making large jumps simply because the adjustment dial allows them.
High resistance
Higher resistance can be useful for experienced grip training.
However, very heavy squeezing increases stress on the fingers, tendons and forearm structures.
Warm up first and avoid repeatedly attempting a resistance you cannot control.
Handle fit matters
Hand size affects how comfortable a gripper feels.
Important factors include:
- Distance between handles.
- Handle length.
- Handle thickness.
- Grip texture.
- Shape of the handle ends.
If the handles are too far apart, users with smaller hands may struggle to position the fingers effectively.
If the handles are too close, users with large hands may feel cramped.
How should the gripper sit in your hand?
A common setup is:
- Place one handle against the base of the palm.
- Wrap the fingers around the opposite handle.
- Keep the wrist relatively neutral.
- Squeeze the handles together under control.
- Release slowly.
The exact placement depends on your hand size and the gripper shape.
The tool should feel secure rather than balanced on the fingertips.
Why handle spacing matters
Wider spacing increases the amount your fingers need to close.
For someone with smaller hands, a very wide starting position may turn the movement into more of a reach challenge than a strength exercise.
Some premium grippers offer adjustable handle spacing.
On simpler models, compare product dimensions before buying.
Handle thickness
Thicker handles change the grip demand.
A thick handle may:
- Increase open-hand demand.
- Feel more comfortable for large hands.
- Be harder for smaller hands to close.
A thinner handle can be easier to wrap the fingers around.
Neither is universally better.
Foam handles vs textured plastic
Foam handles
Advantages:
- Soft.
- Comfortable.
- Reduce pressure on the palm.
Potential drawbacks:
- Can compress.
- May absorb sweat.
- Can tear over time.
Textured plastic or rubber
Advantages:
- Durable.
- Easier to clean.
- Often provides consistent grip.
Potential drawbacks:
- Can feel harder on the hand.
- Aggressive texture may become uncomfortable during high-volume training.
Metal-handled grippers
Some higher-end grippers use metal handles.
These may offer:
- Greater durability.
- Consistent shape.
- A firm training feel.
However, they can be less comfortable without knurling or grip texture.
They are also usually more expensive.
Adjustment dial design
Many adjustable grippers use a dial near the spring.
Look for a mechanism that:
- Turns smoothly.
- Does not loosen during use.
- Has clear position markers.
- Allows gradual changes.
- Is easy to access.
A resistance dial that shifts during repetitions can make training inconsistent.
Spring quality
The spring is the main resistance component.
Important qualities include:
- Smooth compression.
- Consistent return.
- No visible corrosion.
- No unusual creaking.
- Secure attachment.
Inspect the spring periodically.
If it looks damaged or deformed, stop using the gripper.
How accurate are resistance labels?
Treat resistance markings as approximate training references rather than laboratory measurements.
The main value is consistency within the same device.
For example, if your gripper has settings from 1 to 10, you can track progression from setting 4 to setting 5 even if the exact kilogram value is not perfectly calibrated.
How to test a gripper before regular training
If possible:
- Set it to a low resistance.
- Perform several controlled squeezes.
- Check handle comfort.
- Increase resistance slightly.
- Confirm that the mechanism remains stable.
- Test both hands.
Stop if you notice:
- Sharp pain.
- Pinching.
- Spring movement.
- Handle slipping.
How many repetitions should you do?
There is no single correct number.
For general grip strength, moderate repetition sets can work well.
For endurance, higher repetitions may be appropriate.
For maximum strength, lower repetitions with greater resistance may be used.
A simple beginner approach is to choose a resistance that allows controlled repetitions without losing form.
Avoid training to extreme fatigue every session.
Strength vs endurance training
Grip strength
Use higher resistance with fewer controlled repetitions.
Grip endurance
Use lower resistance for more repetitions or longer holds.
General fitness
Use a moderate resistance that allows both good movement quality and gradual progression.
Your goal should determine how you use the gripper.
Isometric holds
An isometric hold means squeezing the gripper and holding the position.
For example:
- Close the gripper as far as you can with control.
- Hold briefly.
- Release slowly.
This can add variety to training.
Avoid holding your breath.
Slow negatives
A slow negative emphasises the opening phase.
You can:
- Close the gripper.
- Resist as the handles open.
- Take several seconds to return to the start.
This can make a moderate resistance feel harder without immediately increasing the setting.
Partial repetitions
Partial repetitions can sometimes be useful for specific strength work, but beginners should usually prioritise controlled full-range repetitions.
If you only train the easiest portion of the movement, you may not build strength evenly through the range.
Training both hands
Grip strength is often different between the dominant and non-dominant hand.
Train each side separately.
Do not automatically give the weaker hand much more volume.
A small difference is normal.
If one hand is significantly weaker because of injury, numbness or unexplained loss of strength, medical assessment may be appropriate.
How often can you train grip?
Grip muscles are involved in many daily and gym activities.
Training too frequently can interfere with:
- Deadlifts.
- Rows.
- Pull-ups.
- Climbing.
- Racquet sports.
A few focused sessions per week may be sufficient for many users.
Adjust frequency based on:
- Soreness.
- Forearm fatigue.
- Other training.
- Recovery.
Grip training before or after weight training?
If grip strength is a secondary goal, train grippers after your main workout.
Fatiguing your hands before:
- Deadlifts.
- Pull-ups.
- Rows.
could reduce performance in those exercises.
If grip strength is your main priority, you may train it earlier when your hands are fresh.
Hand gripper vs lifting straps
These tools serve different purposes.
Hand gripper
Trains grip strength.
Lifting straps
Reduce grip demand during pulling exercises.
They are not opposites.
A lifter may use grippers to train grip separately while using straps during high-volume pulling exercises.
Hand gripper vs stress ball
A stress ball usually provides much lower resistance.
It can be useful for:
- Gentle movement.
- Hand activity.
- Light endurance.
An adjustable gripper is better suited to progressive strength training.
Hand gripper vs wrist curl
Wrist curls mainly train muscles that move the wrist.
Hand grippers focus more on finger flexion and crushing grip.
A complete forearm programme may include both types of movement.
Hand gripper vs dead hangs
Dead hangs train support grip.
The goal is to keep the hand closed around a bar while bodyweight pulls downward.
Hand grippers train crushing grip.
They complement each other rather than replacing one another.
Using grippers for climbing
Climbing requires more than crushing grip.
It also involves:
- Open-hand grip.
- Finger strength.
- Pinch strength.
- Wrist stability.
- Technique.
A gripper can support general hand strength but should not be treated as a complete climbing-training tool.
Using grippers for racquet sports
Stronger hands may help with racquet control, but sport performance depends on many other factors.
Avoid using extremely heavy grippers immediately before playing because forearm fatigue can reduce control.
Can hand grippers improve forearm size?
They can contribute to forearm muscle development, especially the finger flexors.
However, forearm size also responds to:
- Wrist curls.
- Reverse curls.
- Pulling exercises.
- Carries.
- Overall resistance training.
Grippers are useful, but they are not the only option.
Can grippers make veins more visible?
Training may increase forearm muscle development and blood flow during exercise.
Visible veins are also affected by:
- Genetics.
- Body-fat level.
- Temperature.
- Hydration.
Do not use vascularity as the main measure of training progress.
Can hand grippers reduce hand fat?
No.
Grip exercises cannot selectively reduce fat from the hands.
They train muscles.
Body-fat changes occur systemically rather than through spot reduction.
Hand grippers and wrist position
Keep the wrist relatively neutral.
Avoid exaggerated bending forward or backward to force the gripper closed.
If your wrist repeatedly moves during hard repetitions, reduce the resistance.
Why people use too much resistance
The small size of the tool can make users assume that heavier is always better.
But excessive resistance often leads to:
- Partial repetitions.
- Wrist compensation.
- Very slow progression.
- Finger discomfort.
- Tendon irritation.
Controlled movement at a manageable setting is more useful.
Common hand-gripper mistakes
Starting too heavy
Choose a resistance you can control.
Performing very fast repetitions
Use deliberate squeezing and release.
Training only the dominant hand
Train both sides.
Allowing the wrist to bend excessively
Keep the hand and forearm aligned.
Increasing resistance every session
Progress only when the current setting is manageable.
Using the gripper every day despite soreness
Allow recovery.
Ignoring finger or elbow pain
Stop if pain persists.
How to progress with an adjustable gripper
A simple progression system is:
Step 1: Choose a manageable resistance
Perform your planned repetitions with full control.
Step 2: Build consistency
Use the same setting until you can complete your target sets comfortably.
Step 3: Increase slightly
Move the resistance up by a small amount.
Step 4: Reduce repetitions temporarily
The new setting may require fewer reps initially.
Step 5: Build up again
Gradually return to your target volume.
This approach is more sustainable than making large resistance jumps.
Track your training
You can record:
- Resistance setting.
- Repetitions.
- Sets.
- Hold duration.
- Left vs right hand.
This helps you see progress objectively.
It is especially useful because resistance markings between different grippers are not always directly comparable.
When to replace a hand gripper
Replace or stop using it if you notice:
- Cracked handles.
- Loose components.
- Damaged spring.
- Corrosion.
- Unstable adjustment mechanism.
- Sharp edges.
- Uneven resistance.
A damaged spring can fail suddenly.
Cleaning and maintenance
Wipe the handles after training.
If the device has exposed metal:
- Keep it dry.
- Store it away from excessive humidity.
- Check for rust.
Do not apply lubricant to the spring unless the manufacturer recommends it.
Some lubricants may make the handles or adjustment mechanism slippery.
Can hand grippers help after injury?
They may be used in some rehabilitation programmes, but self-prescribing heavy grip training after injury is not appropriate.
If you have:
- Recent hand surgery.
- Tendon injury.
- Nerve symptoms.
- Significant arthritis.
- Persistent pain.
- Reduced sensation.
seek professional guidance before using high resistance.
What if your fingers go numb?
Numbness is not a normal training goal.
Stop using the gripper if you develop:
- Numbness.
- Tingling.
- Burning.
- Persistent weakness.
These symptoms can have causes that require proper assessment.
How to compare adjustable hand grippers before buying
| Factor | What to check |
|---|---|
| Resistance range | Does it cover your current and future needs? |
| Adjustment mechanism | Smooth and secure |
| Handle spacing | Suitable for your hand size |
| Handle material | Foam, rubber, plastic or metal |
| Grip texture | Secure without causing excessive discomfort |
| Spring quality | Smooth and durable |
| Size | Comfortable and portable |
| Resistance markings | Easy to track progression |
| Build quality | No looseness or sharp edges |
| Maintenance | Easy to clean and inspect |
Which gripper should a beginner choose?
A beginner should prioritise:
- Low enough starting resistance.
- Comfortable handle spacing.
- Easy adjustment.
- Secure grip.
- Durable spring.
An extreme maximum resistance is unnecessary.
Progression range matters more.
Which gripper should an experienced user choose?
An experienced user may benefit from:
- Higher maximum resistance.
- Smaller adjustment increments.
- Durable handles.
- More consistent spring tension.
If maximum grip strength is the main goal, fixed heavy-duty grippers may eventually provide more specific training than general adjustable models.
Frequently asked questions
Are adjustable hand grippers accurate?
Resistance figures are useful as approximate references, but they may not be calibrated identically across brands.
Track progress on the same device.
What resistance should a beginner start with?
Start at a level that allows controlled full repetitions without wrist compensation.
There is no universal kilogram setting that fits everyone.
Should I squeeze the gripper as hard as possible every time?
No.
Most training should be controlled.
Maximal efforts can be used selectively by experienced users.
Can I use hand grippers every day?
You can use them frequently at low intensity, but hard grip training every day may interfere with recovery.
Will hand grippers improve deadlift grip?
They may help general crushing-grip strength, but deadlifting relies heavily on support grip.
Bar holds, carries and deadlifts are more specific.
Can hand grippers help with pull-ups?
They may contribute to general hand strength, but hanging and pull-up-specific grip training are more directly related.
Why is one hand weaker?
Small left-to-right differences are common.
A large unexplained change in grip strength, especially with pain or numbness, deserves assessment.
Are adjustable grippers suitable for children?
High-resistance grip training is unnecessary for children without appropriate supervision.
Choose age-appropriate activity rather than treating adult strength equipment as a toy.
Choosing the right adjustable hand gripper
Choose a gripper based on the resistance you can actually use, not the largest number printed on the product.
A useful model should offer enough low-to-moderate resistance for controlled training and enough adjustment to allow progression.
After resistance range, focus on handle spacing, grip comfort, spring quality and adjustment stability.
For most beginners and general fitness users, a comfortable adjustable model with gradual resistance changes is more practical than an extremely heavy gripper.
Physical Glow’s Top 5 Adjustable Hand Grippers in India comparison looks at several adjustable resistance designs and handle formats. Use that comparison alongside this guide, then verify the current resistance range, handle dimensions, adjustment system and materials for the exact gripper you intend to buy.