How to Choose Resistance Bands for Strength and Mobility
Learn how to choose resistance bands for strength and mobility work, with practical guidance on band style, resistance level, exercise type, durability and progression. This beginner-friendly guide helps you make a clear, informed choice without unnecessary complexity.
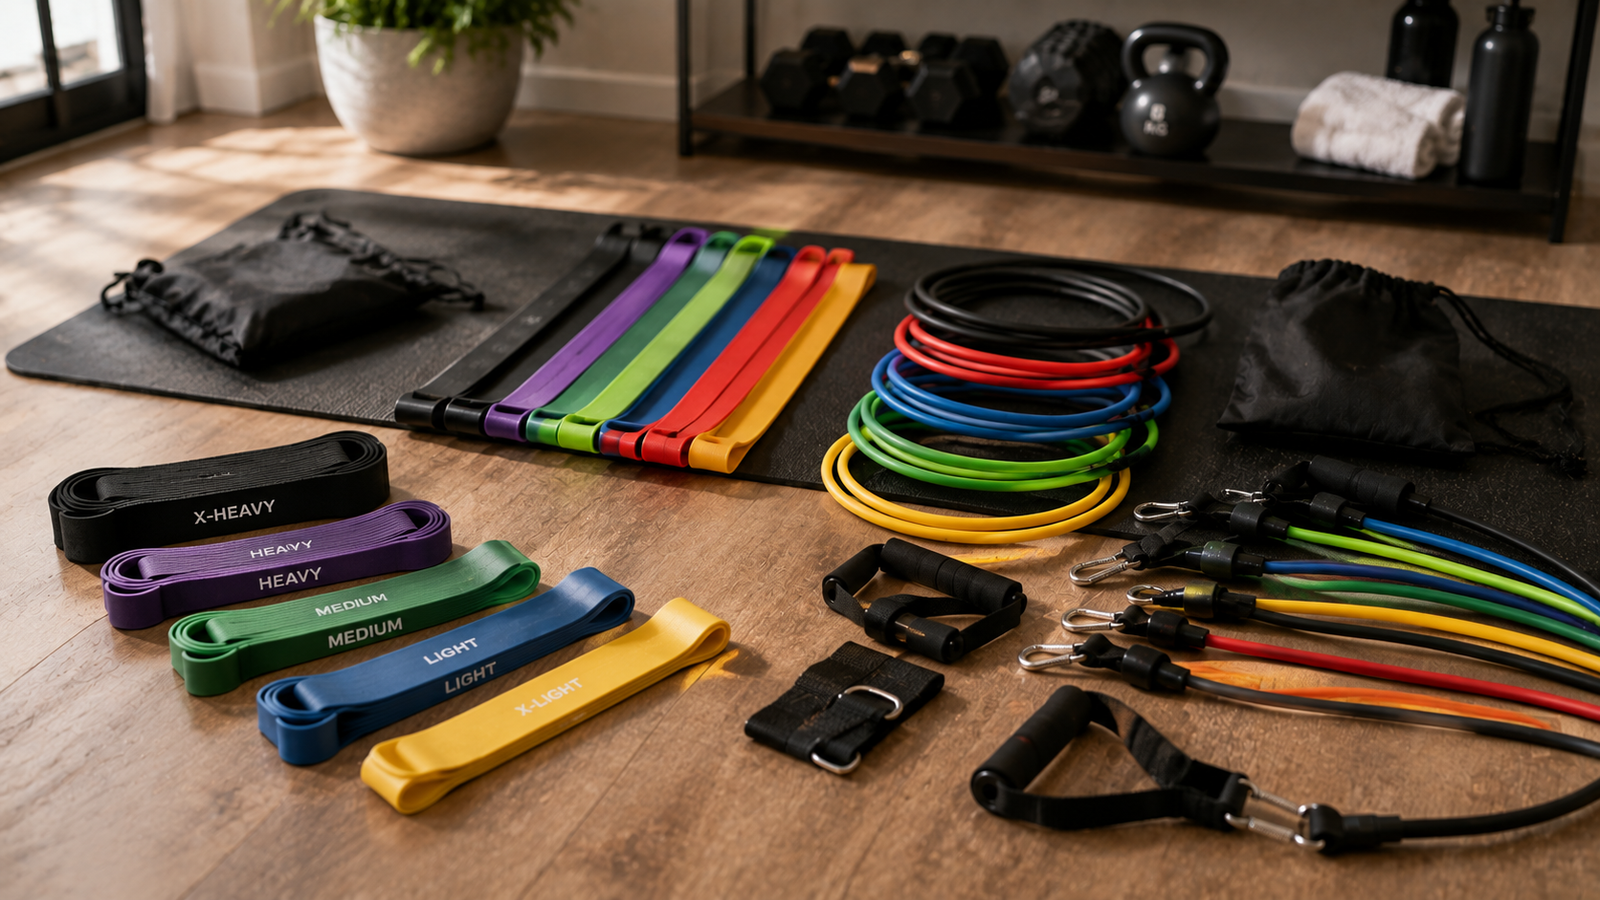
Resistance bands are among the most versatile pieces of training equipment you can own.
They can be used for:
- strength training;
- mobility work;
- warm-ups;
- stretching;
- rehabilitation-style exercises where appropriate;
- assisted pull-ups;
- home workouts;
- travel workouts;
- exercise progression.
They are also:
- compact;
- relatively inexpensive;
- easy to store;
- simple to carry.
But resistance bands vary significantly in:
- shape;
- length;
- material;
- resistance level;
- stretch characteristics;
- durability;
- attachment system;
- intended use.
A short fabric hip band is useful for exercises such as:
- lateral walks;
- glute bridges.
But it cannot replace a long loop band for:
- assisted pull-ups;
- rows;
- presses.
A tube band with handles may work well for:
- curls;
- chest presses;
but may be less convenient for:
- mobility drills.
The practical way to choose resistance bands is:
decide what exercises you want to perform → choose the appropriate band type → select several useful resistance levels → check material and dimensions → evaluate anchors and handles where relevant → inspect durability and safety → then consider storage and price
The best resistance band is not necessarily:
- the thickest;
- the strongest;
- the most expensive;
- the one sold in the largest set.
It is the band that provides enough resistance for your exercises while allowing you to train with:
control → appropriate range of motion → progressive overload → safe setup.
How Resistance Bands Work
Resistance bands create tension as they are stretched.
Unlike a dumbbell or barbell, where resistance comes primarily from:
- gravity;
a band produces increasing tension as it lengthens.
Generally:
more stretch → more resistance
although the exact relationship depends on:
- material;
- thickness;
- width;
- length;
- construction.
This gives bands a different resistance profile from free weights.
Variable Resistance
The resistance provided by a band is not constant throughout the movement.
For example, during a banded biceps curl:
Bottom Position
The band may be only slightly stretched.
Resistance is relatively low.
Top Position
The band is stretched farther.
Resistance increases.
This is called:
variable resistance
and it can be useful for many exercises.
Resistance Bands vs Dumbbells
Both can build strength.
Dumbbells
Provide resistance through gravity.
Advantages:
- easy load tracking;
- predictable resistance;
- excellent for progressive strength training.
Resistance Bands
Provide elastic resistance.
Advantages:
- portable;
- inexpensive;
- versatile;
- usable from many angles.
Neither is universally superior.
For home training, they work extremely well together.
Can Resistance Bands Build Muscle?
Yes.
Muscle growth primarily requires the target muscles to receive:
- sufficient tension;
- enough training volume;
- appropriate progression.
Bands can provide substantial resistance.
Research generally supports elastic resistance as a legitimate strength-training method when exercises are performed with enough:
- effort;
- progression.
However, free weights may make very heavy loading easier to:
- quantify;
- standardize.
Can Bands Build Strength?
Yes.
Particularly for:
- beginners;
- intermediate trainees;
- accessory exercises.
Their effectiveness depends on whether you can progressively make the exercise harder.
Progression can come from:
- stronger band;
- greater stretch;
- more repetitions;
- additional sets;
- different exercise leverage.
Are Bands Only for Beginners?
No.
Resistance bands are used by:
- beginners;
- bodybuilders;
- powerlifters;
- athletes;
- physiotherapists;
- experienced lifters.
Advanced users may use them for:
- accommodating resistance;
- accessory exercises;
- warm-ups;
- mobility;
- exercise assistance.
Are Resistance Bands Only for Rehabilitation?
No.
They are common in rehabilitation, but they are also legitimate strength-training equipment.
A heavy resistance band can create considerable force.
The fact that a band is lightweight does not mean the exercise is:
- easy.
Main Types of Resistance Bands
The major categories include:
- Mini loop bands
- Fabric hip bands
- Long loop bands
- Flat therapy bands
- Tube bands with handles
- Figure-eight bands
- Resistance-band systems with bars or platforms
Each is suited to different exercises.
Mini Loop Bands
Mini bands are small closed loops.
They are commonly placed around:
- thighs;
- knees;
- ankles;
- feet.
They are popular for lower-body exercises.
Common Mini-Band Exercises
- lateral walks;
- monster walks;
- glute bridges;
- clamshells;
- squat variations;
- hip abduction.
Advantages of Mini Bands
- very compact;
- inexpensive;
- simple;
- useful for warm-ups and accessory exercises.
Disadvantages
Their short length limits versatility.
They are not ideal for exercises such as:
- rows;
- presses;
- pull-up assistance.
Latex Mini Bands
Usually thin and highly elastic.
Advantages:
- inexpensive;
- available in many resistance levels.
Potential disadvantages:
- can roll;
- may pinch skin;
- can catch leg hair;
- latex allergy risk.
Fabric Mini Bands
Usually made from woven elastic material.
They are often wider and thicker.
Advantages of Fabric Bands
- less rolling;
- comfortable around legs;
- durable;
- strong resistance.
Disadvantages
They typically stretch less.
This makes them excellent for:
- hip exercises;
but less versatile for large ranges of motion.
Fabric vs Latex Mini Bands
Choose Fabric If:
Your main use is:
- glute training;
- lateral walks;
- lower-body activation.
Choose Latex If:
You want:
- greater stretch;
- more exercise variety;
- lighter resistance options.
Many users benefit from having both.
Long Loop Resistance Bands
Long loop bands are large continuous loops.
They are among the most versatile resistance bands available.
They can be used for:
- rows;
- presses;
- squats;
- deadlift variations;
- pull-up assistance;
- mobility;
- stretching.
Why Long Loop Bands Are So Useful
You can:
- stand on them;
- anchor them;
- loop them around equipment;
- use them for assistance.
A set of long loop bands can support an extensive home workout program.
Pull-Up Assistance
One of their most common uses.
The band is attached to a:
- pull-up bar;
and supports part of your body weight.
How Pull-Up Assistance Works
A stretched band provides the most assistance when:
- fully lengthened.
During a pull-up, this means more assistance is usually provided near the:
- bottom.
Less assistance occurs near the:
- top.
This can help beginners practice full-range repetitions.
Choosing Pull-Up Assistance
Thicker bands generally provide:
- more assistance.
Start with enough assistance to perform controlled repetitions.
As strength improves:
- use a thinner band.
Pull-Up Band Safety
Make sure the band is securely attached.
Inspect it before each session for:
- cuts;
- cracks;
- tears.
A band snapping while stretched under the foot or knee can cause injury.
Pull-Up Band Foot vs Knee Placement
Some people place the band under:
- foot;
- knee.
Both approaches are used.
Placing a foot inside a heavily stretched loop may make exiting more awkward.
Use a setup you can control safely.
Long Bands for Strength Training
They can be used for:
- shoulder presses;
- rows;
- chest presses;
- good mornings;
- squats;
- curls;
- triceps extensions.
Anchoring options significantly increase exercise variety.
Flat Therapy Bands
These are long strips rather than closed loops.
They are commonly associated with:
- physiotherapy;
- rehabilitation;
- mobility.
Advantages
- extremely lightweight;
- easy to adjust length;
- easy to tie;
- available in very light resistance.
Disadvantages
- may tear more easily;
- less convenient for heavy loading;
- no handles.
They are excellent for:
- light resistance;
- shoulder exercises;
- mobility work.
Therapy Band Resistance
Different colours often indicate different resistance levels.
But colour systems are not standardized across manufacturers.
Do not assume:
red = medium
across all brands.
Read the actual resistance information.
Tube Bands With Handles
Tube bands use elastic tubing connected to:
- handles.
They are designed to mimic many cable-machine exercises.
Common Exercises
- chest press;
- row;
- shoulder press;
- curl;
- lateral raise;
- triceps extension.
Advantages
- comfortable handles;
- intuitive;
- good for home workouts.
Disadvantages
- more components;
- attachment points can wear;
- carabiners or clips can fail;
- less suitable for certain mobility exercises.
Stackable Tube Bands
Some systems allow multiple tubes to attach simultaneously to the same handles.
This increases resistance.
Advantages of Stackable Systems
They provide many combinations.
For example:
- 5 kg-equivalent tube;
- 10 kg-equivalent tube;
- both together.
But stated resistance values should be interpreted cautiously.
Why Resistance Numbers Can Be Misleading
A tube may be labelled:
- 15 kg;
- 30 lb;
- 40 lb.
But resistance depends on:
- how far it is stretched.
A “15 kg” band does not necessarily provide 15 kg of force throughout an exercise.
Check whether the manufacturer states resistance at a specific:
- extension percentage;
- length.
Figure-Eight Bands
These bands form two connected loops.
They are usually used for:
- upper-body exercises;
- light conditioning.
They are compact but less versatile than:
- long loops;
- tube systems.
For most home users, they are not essential.
Resistance Bands With Ankle Cuffs
Tube systems may include ankle attachments.
These allow exercises such as:
- hip abduction;
- hip extension;
- hip flexion.
What Makes a Good Ankle Cuff?
Look for:
- secure closure;
- strong stitching;
- comfortable padding;
- durable attachment ring.
The cuff should not dig excessively into:
- ankle;
- lower leg.
Resistance Band Bar Systems
Some systems attach bands to:
- short bars;
- floor platforms.
These are designed to replicate exercises such as:
- squats;
- presses;
- deadlifts.
Advantages
- structured setup;
- easier bilateral loading;
- familiar bar-like grip.
Disadvantages
- less portable;
- proprietary parts;
- more expensive.
For most users, simple bands provide greater:
- flexibility;
- value.
Resistance Band Material
The most common materials include:
- natural latex;
- synthetic rubber;
- fabric/elastane blends.
Material influences:
- stretch;
- durability;
- feel;
- allergy considerations.
Natural Latex
Very common.
Advantages:
- excellent elasticity;
- high resistance range;
- relatively durable.
Disadvantages:
- latex allergy;
- rubber smell;
- can degrade with heat and sunlight.
Latex Allergy
People with known latex allergy should choose:
- latex-free bands.
Check product specifications carefully.
Do not assume a fabric exterior means there is no latex inside.
Synthetic Rubber
Some bands use latex-free synthetic materials.
These may be suitable for users with:
- latex sensitivity.
Performance varies between materials.
Fabric Bands
Fabric blends are commonly used in:
- hip bands.
Advantages:
- comfortable;
- less rolling;
- strong.
Disadvantages:
- less stretch;
- can absorb sweat.
Band Width
Wider bands generally provide:
- greater resistance;
when material and thickness are otherwise similar.
Width also affects:
- comfort.
Wide Hip Bands
Spread pressure across a larger surface.
This can reduce:
- digging into skin.
Narrow Bands
May be more versatile for:
- mobility;
- upper-body work.
But can feel more concentrated against the body.
Band Thickness
Thickness is one of the main factors determining resistance.
Thicker bands generally require more force to stretch.
Do Not Judge Resistance by Width Alone
Two bands may have identical width but different:
- thickness;
- material;
- elasticity.
Always use the manufacturer’s resistance guidance.
Resistance Levels
Band sets may include labels such as:
- extra light;
- light;
- medium;
- heavy;
- extra heavy.
These are relative descriptions.
Why Multiple Resistance Levels Matter
Different exercises require different resistance.
For example:
Shoulder External Rotation
May need:
- very light band.
Row
May use:
- medium or heavy band.
Squat
May require:
- significantly heavier resistance.
A single band rarely suits an entire workout.
How Many Bands Should You Buy?
For general home training, a useful set often includes:
- light;
- medium;
- heavy.
A broader five-band set provides even more flexibility.
Extremely Heavy Bands
Useful for:
- assisted pull-ups;
- heavy lower-body work;
- barbell accommodating resistance.
They may be excessive for:
- beginners;
- smaller upper-body exercises.
Very Light Bands
Extremely useful for:
- shoulder work;
- mobility;
- warm-ups.
Do not overlook them.
Resistance Does Not Equal Weight
A resistance band cannot be interpreted exactly like a:
- dumbbell.
For example, a band labelled “20 kg” does not mean a banded curl feels exactly like curling:
- 20 kg dumbbell.
The resistance curve is different.
How Band Resistance Changes Through Range
Consider a standing band row.
Starting Position
Band may be moderately stretched.
End Position
Band is stretched farther.
Resistance increases.
The exercise becomes hardest near the:
- shortened position;
depending on setup.
Pre-Stretch
Pre-stretch refers to tension already present before the repetition begins.
More pre-stretch usually increases resistance throughout the movement.
Adjusting Resistance Without Changing Bands
You can increase difficulty by:
- standing farther from anchor;
- shortening the band;
- widening stance on band;
- doubling part of band.
But do not create unsafe excessive tension.
Shortening a Band
Holding farther down a band increases pre-tension.
This can make an exercise harder.
Doubling a Band
For certain exercises, folding the band can increase resistance.
Only do this if the band and exercise setup safely allow it.
Combining Bands
Multiple bands can sometimes be used together.
This can provide greater resistance.
But stacking too many bands can create:
- awkward handling;
- unsafe attachment loads.
Use systems designed for stacking.
Band Length
Length significantly affects exercise possibilities.
Short Mini Bands
Best for:
- hips;
- lower-body accessory work.
Long Loop Bands
Best for:
- full-body exercises;
- pull-up assistance;
- stretching.
Long Flat Bands
Best for:
- mobility;
- rehabilitation-style work.
Tube Length
Tube bands must be long enough for exercises such as:
- overhead press;
- chest press.
Very short tubes may create excessive tension.
User Height Matters
Taller users generally stretch standing bands farther during:
- presses;
- curls.
This means the same band may feel stronger to a taller person.
Resistance Bands and Progressive Overload
One limitation of bands is that progression is less precisely measurable than with:
- plates;
- dumbbells.
But progression is still possible.
Ways to Progress
1. Use a Stronger Band
Simplest method.
2. Increase Pre-Stretch
Create more starting tension.
3. Increase Repetitions
For example:
10 → 12 → 15.
4. Add Sets
Increase total volume.
5. Slow the Repetition
More time under tension.
6. Add Pauses
Pause at the hardest position.
7. Change Leverage
Use a more difficult variation.
Double Progression With Bands
Choose a resistance and rep range.
For example:
8–15 repetitions
Once you can perform:
- 15 controlled reps;
move to a stronger band and return toward:
- 8–10 reps.
This makes progression more structured.
Recording Band Workouts
Write down:
- band colour;
- brand;
- setup;
- repetitions.
Because colours are not standardized, record specific information such as:
Brand X blue long loop, 12 reps
rather than simply:
blue band
if multiple band systems are used.
Band Exercise Setup Matters
Resistance changes dramatically with anchor distance.
For consistency, try to repeat the same:
- body position;
- anchor;
- starting length.
This makes progression easier to track.
Resistance Bands for Squats
A long loop band can be positioned under the feet and across:
- shoulders;
- hands.
Resistance increases as you stand.
Band Squat Benefits
- compact;
- no heavy weights;
- variable resistance.
Limitations
Heavy bands may become difficult to position safely.
For very high lower-body strength, free weights often make loading easier.
Banded Goblet Squat
Bands can also be combined with:
- dumbbell;
- kettlebell.
This adds resistance near lockout.
Advanced technique is not necessary for most users.
Resistance Bands for Deadlifts
Stand on the band and hold:
- ends;
- handles.
As you stand, resistance increases.
Band Deadlift Limitations
Heavy bands can place considerable pressure on:
- hands;
- feet.
Tube bands with handles may be more comfortable.
Band Romanian Deadlift
Useful for:
- hamstrings;
- glutes.
Focus on:
- hip hinge;
- controlled movement.
Resistance Bands for Rows
Anchor the band in front of you.
Pull toward:
- torso.
This is one of the easiest and most effective band exercises.
Seated Band Row
The band may be looped around:
- feet;
if the setup is secure.
Avoid anchoring around anything that can:
- slip;
- break.
Standing Band Row
Anchor around a stable fixed object.
Keep the body controlled.
Resistance Bands for Chest Press
Anchor behind the body.
Press forward.
This mimics a cable chest press.
Anchor Height
Different heights change emphasis.
For example:
- chest height;
- low-to-high;
- high-to-low.
Resistance Bands for Push-Ups
A long loop band can pass across the upper back and under the hands.
This increases resistance near:
- top of push-up.
Useful for stronger trainees.
Resistance Bands for Shoulder Press
Stand on a long band or tube band.
Press overhead.
Ceiling Height
Band presses require less equipment but still need overhead clearance.
Check for:
- fans;
- lights.
Resistance Bands for Lateral Raises
Stand on a light band.
Raise arms to sides.
Because tension increases through range, the top becomes very challenging.
Use lighter resistance than expected.
Resistance Bands for Biceps Curls
Stand on band.
Curl handles or ends.
Very simple and effective.
Resistance Bands for Triceps
Anchor overhead or high behind you.
Perform:
- pushdowns;
- overhead extensions.
Resistance Bands for Face Pulls
Anchor at approximately upper-chest or face height.
Pull toward:
- face.
Use a light-to-moderate band.
Do not turn it into an uncontrolled heavy row.
Resistance Bands for Lat Pulldowns
Anchor overhead.
Pull toward upper chest.
This can be useful when you do not have:
- cable machine.
Overhead Anchor Safety
The anchor must be extremely secure.
A band under high tension releasing from above can strike:
- face;
- body.
Resistance Bands for Glutes
Bands are commonly used for:
- lateral walks;
- hip abduction;
- bridges;
- kickbacks.
Do Bands “Activate” the Glutes?
They create resistance for hip muscles.
They may be useful in warm-ups.
But your glutes do not need to be “switched on” with bands before every workout.
Exercises such as:
- squats;
- deadlifts;
- lunges;
already train the glutes.
Glute Activation Marketing
Be cautious with claims that bands:
- activate dormant glutes;
- reshape hips instantly;
- melt thigh fat.
Bands provide resistance.
They do not selectively burn fat from:
- hips;
- thighs.
Mini Bands Around Knees During Squats
Sometimes used as a cue to encourage:
- outward knee pressure.
But continuously forcing the knees against a band is not necessary for everyone.
Use it as a training tool rather than a permanent requirement.
Lateral Walk Technique
Keep:
- controlled steps;
- band tension.
Avoid excessively wide steps that distort:
- knee;
- hip position.
Resistance Bands for Hamstrings
Options include:
- standing leg curls;
- lying leg curls;
- banded RDLs.
Band Leg Curls
Anchor low.
Attach around:
- ankle;
using a secure cuff where possible.
Resistance Bands for Calves
Bands can add resistance to:
- plantar flexion;
- seated calf movements.
But standing calf raises may be easier to load with:
- bodyweight;
- dumbbells.
Resistance Bands for Core Training
Useful exercises include:
- Pallof press;
- rotations;
- anti-rotation holds;
- chops.
Pallof Press
Anchor band to the side.
Hold at chest.
Press arms forward while resisting:
- rotation.
Excellent for trunk control.
Band Rotations
These train rotational movement.
Use controlled range.
Do not twist explosively with heavy resistance before developing technique.
Resistance Bands for Mobility
Bands are often used to assist:
- stretching;
- joint mobility drills.
Stretching With Bands
Long flat or loop bands can help extend your reach during:
- hamstring stretches;
- shoulder stretches.
Do not pull so hard that stretching becomes painful.
Mobility vs Strength
The same band may be used differently.
Mobility
Usually lighter resistance and controlled range.
Strength
Higher tension and progressive effort.
Do not assume a mobility drill should feel like a maximal strength exercise.
Resistance Bands for Shoulder Warm-Ups
Light bands are commonly used for:
- external rotation;
- pull-aparts;
- face pulls.
These can be useful before upper-body training.
Band Pull-Aparts
Hold a light band in front of you.
Pull hands apart while keeping:
- arms controlled.
Avoid using a band so heavy that movement becomes:
- jerky;
- shortened.
Shoulder External Rotation
Use light resistance.
This exercise targets smaller shoulder muscles.
Heavier is not automatically better.
Resistance Bands for Assisted Stretching
A band can function like a:
- strap.
But highly elastic bands may make tension harder to control.
For static stretching, a non-elastic yoga strap may sometimes be easier.
Resistance Bands for Pull-Up Assistance
This deserves careful selection because band strength strongly affects difficulty.
Heavy Assistance Band
Best for someone unable to perform:
- unassisted repetitions.
Medium Assistance
Useful as strength improves.
Light Assistance
Useful for transitioning toward:
- bodyweight pull-ups.
Progressing Away From Assisted Pull-Ups
A simple method:
- Use heavy band.
- Build controlled repetitions.
- Move to medium band.
- Move to light band.
- Practice unassisted repetitions.
Band Assistance Changes Through the Pull-Up
Remember:
- most help at bottom;
- least help near top.
This means a band-assisted pull-up does not perfectly mimic:
- unassisted resistance.
Alternatives to Band-Assisted Pull-Ups
Other options include:
- assisted pull-up machine;
- foot-assisted pull-ups;
- eccentric pull-ups;
- lat pulldowns.
Use whichever supports good progression.
Resistance Bands With Barbells
Advanced strength athletes may attach bands to:
- barbell;
- rack.
This is called:
accommodating resistance.
How Banded Barbell Resistance Works
As the bar rises, the band stretches.
Resistance increases near the:
- top.
This can alter the force curve.
Common Uses
- banded squats;
- banded bench press;
- banded deadlifts.
Is This Necessary for Beginners?
No.
This is an advanced programming tool.
Most beginners should focus on:
- normal barbell loading;
- basic progression.
Anchor Safety for Banded Barbell Training
Bands must be attached:
- symmetrically;
- securely.
Unequal tension can create an uneven bar.
This type of setup deserves careful coaching.
Resistance Bands for Travel
Bands are one of the best pieces of travel fitness equipment.
A small kit may include:
- long loop band;
- mini band.
This weighs very little.
Travel Workout Example
Band Squat
3 × 12–20
Standing Row
3 × 12–20
Chest Press
3 × 10–15
Shoulder Press
3 × 10–15
Lateral Walk
3 rounds
Pallof Press
3 × 10 each side
Hotel-Room Training
Avoid attaching bands to:
- furniture;
- fixtures;
unless you know they can safely handle the force.
A lightweight chair is not a safe anchor.
Resistance Bands for Office Workouts
A light band can be useful for:
- pull-aparts;
- shoulder exercises;
- mobility.
But short movement breaks and walking may be simpler for many people.
Resistance Bands for Beginners
Bands are excellent beginner equipment because resistance can be:
- low;
- adjustable.
A beginner set should include at least:
- light;
- medium;
- heavy.
Beginner Exercises
- squat;
- row;
- chest press;
- curl;
- lateral walk;
- Pallof press.
Focus on:
- controlled repetitions.
Resistance Bands for Older Adults
Bands can provide manageable resistance without requiring heavy weights.
Useful features include:
- comfortable handles;
- light resistance;
- simple setup.
But balance and anchoring should be considered carefully.
Resistance Bands and Arthritis
Handles may be easier for users who find gripping flat bands uncomfortable.
Choose:
- thicker comfortable grips;
- appropriate resistance.
Resistance Bands During Rehabilitation
Bands are widely used in physical therapy.
But rehabilitation exercises should be selected based on:
- injury;
- stage of recovery;
- individual capacity.
Do not assume that because a band exercise looks gentle it is automatically appropriate for every injury.
Follow professional guidance where needed.
Resistance Bands and Pregnancy
Resistance bands can be part of strength training during pregnancy where exercise is appropriate.
But exercise selection, body position and intensity may need modification.
Individual medical guidance may be relevant depending on:
- pregnancy;
- symptoms;
- previous exercise experience.
Resistance Bands for Children and Teenagers
They can be used appropriately under:
- supervision.
Choose manageable resistance.
Teach children not to:
- stretch bands toward faces;
- snap bands at each other.
Bands can behave like powerful elastic projectiles.
Band Anchors
Anchoring is one of the most important safety considerations.
Common anchor points include:
- door anchors;
- rack posts;
- sturdy fixed structures.
Door Anchors
A door anchor usually consists of:
- padded stopper;
- loop.
The stopper sits on the opposite side of the closed door.
Choosing a Door Anchor
Look for:
- strong webbing;
- large padded stopper;
- reinforced stitching.
Door Direction Matters
Whenever possible, position yourself so pulling force moves the door:
- toward the frame;
rather than pulling it open.
Follow the anchor manufacturer’s instructions.
Never Use an Unlocked Door
The door should be:
- securely closed;
- ideally locked if appropriate.
Someone opening it during the exercise could cause:
- sudden release;
- injury.
Check the Door
Avoid attaching high-tension bands to:
- weak doors;
- damaged frames;
- lightweight fixtures.
Door Hinge Side vs Opening Side
Some anchor instructions specify particular positioning.
Use exactly as directed.
The safest arrangement generally prevents the band from pulling the door:
- open.
Anchoring Around Furniture
Be cautious.
A table leg may:
- move;
- break.
A chair may tip.
Use only structures that are clearly capable of handling the force.
Anchoring to a Power Rack
This is generally secure if:
- rack is stable;
- band is correctly positioned.
Avoid placing bands across:
- sharp metal edges.
Sharp Edges
Resistance bands can be cut by:
- rough metal;
- exposed screws;
- sharp corners.
Use smooth anchor surfaces.
Protective Anchor Sleeves
Some systems include fabric sleeves to protect bands from abrasion.
Useful for:
- outdoor posts;
- rough surfaces.
Outdoor Anchoring
Possible options include sturdy:
- poles;
- posts;
- trees.
Inspect the surface.
Rough bark or concrete can damage bands.
Do Not Wrap Bands Around Thin Sharp Objects
This concentrates stress in a small area.
It can cause:
- cutting;
- premature failure.
Carabiners
Tube-band systems often use carabiners to connect:
- handles;
- anchors.
Carabiner Quality Matters
Look for:
- solid construction;
- smooth edges;
- secure closure.
Do not use decorative clips.
Weight Ratings
If a band system provides hardware weight ratings, stay within them.
Remember that elastic tension can create significant:
- dynamic force.
Handles
Tube-band handles vary considerably.
Important features include:
- grip diameter;
- padding;
- strap strength.
Foam Handles
Comfortable.
But foam can:
- absorb sweat;
- degrade.
Rubber Handles
Durable and easy to clean.
May become slippery when wet if poorly textured.
Hard Plastic Handles
Durable but may feel uncomfortable during heavy resistance.
Handle Strap
The strap connecting the handle to the band should have:
- strong stitching;
- reinforced attachment.
Inspect regularly.
Ankle Straps
These should have:
- secure Velcro;
- strong D-ring;
- padding.
Do not attach extremely heavy resistance to a weak ankle cuff.
Resistance Band Safety
Bands can fail suddenly.
This makes inspection essential.
Inspect Before Every Workout
Look for:
- cuts;
- cracks;
- tears;
- thinning;
- discolouration;
- damaged seams.
Why Small Tears Matter
Elastic material under tension can propagate a small tear rapidly.
A slightly damaged band may suddenly:
- snap.
Do not continue using a visibly compromised band.
High-Tension Exercises Need More Inspection
Particularly:
- assisted pull-ups;
- heavy rows;
- presses;
- banded barbell work.
The more stretch and force involved, the greater the consequence of failure.
Keep Bands Away From the Face
Whenever possible, position yourself so a failed band is less likely to strike:
- face;
- eyes.
Eye protection is not normally required for resistance-band exercise, but smart positioning matters.
Do Not Overstretch Bands
Manufacturers may specify maximum extension such as:
- 2× resting length;
- 3×;
depending on design.
Follow those limits.
More Stretch Is Not Always Better
Excessive stretching accelerates wear and increases failure risk.
Use a stronger band instead.
Band Age
Elastic materials deteriorate over time even if they look reasonably good.
Heat, sunlight and repeated stretching accelerate:
- degradation.
There is no universal replacement interval.
Inspect condition rather than relying only on age.
Sunlight
UV exposure can damage:
- rubber;
- latex.
Do not store bands permanently in:
- direct sunlight.
Heat
Avoid:
- hot car interiors;
- heaters;
- radiators.
Heat can degrade elastic material.
Cold
Extreme cold can alter elasticity temporarily.
Allow bands to return to appropriate room temperature if needed.
Moisture
Dry bands after:
- sweaty workouts;
- cleaning.
Fabric bands in particular can remain damp.
Oil and Chemicals
Certain chemicals can damage:
- latex;
- rubber.
Avoid contact with:
- oils;
- solvents;
- harsh cleaning products.
Lotions
Body oils and lotions may transfer to bands.
Wipe according to manufacturer instructions.
Cleaning Latex Bands
A typical approach may be:
- damp cloth;
- mild soap if permitted;
- air dry.
Do not use harsh chemicals.
Cleaning Fabric Bands
Some may be:
- hand washable;
- machine washable.
Check care instructions.
Do Not Machine Wash Without Checking
Heat and aggressive cycles may damage:
- elastic fibres;
- stitching.
Drying Fabric Bands
Air drying is usually safest.
Avoid high heat unless manufacturer allows it.
Tube-Band Cleaning
Wipe:
- tubes;
- handles.
Do not immerse hardware unless designed for it.
Storage
Bands should be stored:
- clean;
- dry;
- untangled.
Hanging Bands
A smooth hook works well.
Avoid sharp metal edges.
Rolling Bands
Long loops can be gently coiled.
Do not tightly knot them.
Knots
Tying knots creates concentrated stress.
Avoid storing or using bands with tight knots unless the product is specifically designed for tying.
Resistance Band Bag
Many sets include a small pouch.
Useful for:
- organization;
- travel.
Make sure bands are dry before sealing them inside.
Band Rolling During Exercise
Thin mini bands may roll up on:
- thighs;
- knees.
This can become uncomfortable.
How to Reduce Rolling
- place band on clothing;
- choose wider band;
- use fabric band;
- avoid excessive stretch.
Band Pinching Skin
Latex bands can pinch:
- leg hair;
- skin.
Fabric bands reduce this.
Band Slipping
A band may slide if:
- surface is smooth;
- body position changes;
- resistance is too high.
Place mini bands securely above or below joints as appropriate.
Avoid placing resistance directly over:
- kneecap.
Band Placement Around Knees
Many exercises use bands:
- above knees.
This is generally more comfortable than directly over the joint.
Mini Bands Around Ankles
Increase leverage and can make hip exercises much harder.
Use lighter resistance than when the band is around:
- thighs.
Mini Bands Around Feet
Can strongly increase hip-abduction demand.
Ensure the band cannot unexpectedly:
- roll off;
- snap.
Resistance Bands and Joint Stress
Bands are often described as “joint friendly.”
This can be true because resistance can be gradually applied.
But poorly selected resistance or technique can still cause:
- pain;
- overuse.
No equipment is automatically safe for every joint.
Pain During Band Exercise
Muscular effort is expected.
Sharp or persistent joint pain is not.
Reduce:
- resistance;
- range;
- volume.
If pain persists, seek appropriate evaluation.
Shoulder Pain
Very heavy band work can create substantial shoulder torque.
Do not use heavy bands for:
- external rotation;
just because you can.
Smaller stabilizing muscles often require lighter resistance.
Knee Pain
Mini-band exercises may alter knee position.
Do not force excessive outward pressure.
Use controlled alignment.
Back Pain
Band hinges and rows still require:
- trunk control.
Lightweight equipment does not make poor mechanics harmless.
Resistance Bands and Balance
Standing on a band adds some instability.
Older adults or people with balance limitations may prefer:
- seated exercises;
- anchored setups.
Anchored Exercise Safety
The main risk is not just the band.
It is whether the:
- anchor;
- attachment;
- door;
can fail.
Treat anchoring as seriously as the band itself.
Common Resistance Band Marketing Claims
Be cautious with claims such as:
- sculpt without effort;
- melt belly fat;
- activate muscles 300% more;
- replace every gym machine;
- eliminate joint pain;
- guarantee injury prevention.
Bands are useful because they provide:
- resistance.
They do not change basic physiology.
“Tone Without Bulking”
This is largely marketing language.
Muscle appearance depends on:
- muscle size;
- body-fat level;
- genetics.
Bands can help build muscle like other resistance tools.
They do not create a unique type of “toned” muscle.
“Booty Bands”
This is mainly a marketing label for:
- mini resistance bands.
They can strengthen hip muscles.
They cannot selectively:
- enlarge glutes;
- reduce thigh fat;
without an appropriate training and nutrition program.
“Fat-Burning Bands”
Bands do not directly burn fat from the body area where they are placed.
Spot reduction is not reliably achieved through local resistance exercise.
Do Resistance Bands Replace a Gym?
For some people:
- yes, partly.
A well-designed band program can provide excellent general strength training.
But limitations may appear when you want:
- very heavy lower-body loading;
- maximal strength;
- precise resistance increments.
Bands for Small Apartments
This is one of their greatest strengths.
A complete set may fit inside:
- drawer;
- backpack.
No rack is required.
Bands for Travel
Excellent.
A pair of:
- long loops;
- mini bands;
can replace a surprising amount of equipment.
Bands for Outdoor Training
Useful because they are portable.
But keep them away from:
- sharp ground;
- hot surfaces;
- rough concrete.
Bands for Warm-Ups
A light band can be useful before:
- upper-body;
- lower-body workouts.
Examples:
- pull-aparts;
- shoulder rotations;
- lateral walks.
But warm-ups do not need to be long or exhausting.
Do You Need to “Activate” Every Muscle Before Training?
No.
A warm-up should prepare you for the planned activity.
A few band exercises can help, but 20 minutes of activation drills before every session may be unnecessary.
Bands for Cool-Downs
Bands can assist:
- stretching.
But they are not required.
A cool-down may simply involve:
- gradual reduction in intensity;
- optional stretching.
Band Exercise Tempo
Controlled repetitions are generally best.
Avoid letting the band:
- snap back.
Eccentric Control
The return phase should usually be controlled.
For example, during a row:
- pull;
- slowly allow arms forward.
Do not let the band jerk the body toward the anchor.
Band Momentum
Swinging or bouncing can reduce muscular control.
Use momentum only in exercises specifically designed for:
- explosive movement.
Most band strength exercises should feel controlled.
Range of Motion
Do not shorten the movement simply to use a heavier band.
Choose resistance that allows:
- intended range.
Band Tension at the Start
Avoid completely slack bands during many strength exercises.
Some pre-tension often creates smoother resistance.
But excessive pre-tension may make the starting position unsafe.
Resistance Band Starter Kit
For many home users, a practical kit includes:
Long Loop Bands
- light;
- medium;
- heavy.
Mini Bands
- light;
- medium;
- heavy.
Door Anchor
If you want rows and presses.
This is enough for a large variety of workouts.
Do You Need Tube Bands Too?
Not necessarily.
If you prefer handles, tube bands may be more comfortable.
If you already have long loop bands, much of the exercise functionality overlaps.
Minimalist Resistance-Band Setup
For travel or limited storage:
- one light long loop;
- one medium long loop;
- one mini band.
This can support many exercises.
Expanded Home Setup
- five long loop resistances;
- mini-band set;
- door anchor;
- ankle cuff;
- handles if compatible.
This covers most general band training.
Resistance Band Workout for Beginners
Band Squat
3 × 10–15
Standing Row
3 × 10–15
Chest Press
3 × 10–15
Biceps Curl
2–3 × 10–15
Lateral Walk
2–3 rounds
Pallof Press
2–3 × 10 each side
Rest as needed.
Full-Body Band Workout
Romanian Deadlift
3 × 8–15
Split Squat
3 × 8–12 each side
Row
3 × 8–15
Chest Press
3 × 8–15
Shoulder Press
3 × 8–12
Triceps Extension
2 × 10–15
Curl
2 × 10–15
Band Mobility Session
Use light resistance.
Shoulder Pull-Apart
2 × 12–15
External Rotation
2 × 10–15
Assisted Hamstring Stretch
Controlled holds
Hip Mobility Drill
Controlled repetitions
Do not force extreme ranges.
Lower-Body Mini-Band Session
Lateral Walk
3 rounds
Glute Bridge
3 × 15
Squat
3 × 12
Standing Hip Abduction
3 × 12 each side
Upper-Body Band Session
Row
3 × 12
Chest Press
3 × 12
Shoulder Press
3 × 10
Face Pull
3 × 15
Curl
2 × 15
Triceps Extension
2 × 15
How to Make Band Training Harder Without More Equipment
Slow the Eccentric
For example:
- 3-second return.
Add Pauses
Hold peak contraction.
Increase Repetitions
Within a sensible range.
Increase Pre-Tension
Safely.
Use Unilateral Exercises
One arm or leg at a time.
Reduce Rest Periods
Useful for conditioning.
Unilateral Band Training
Excellent for making lighter resistance more challenging.
Examples:
- one-arm row;
- single-arm press;
- split squat;
- single-arm Pallof press.
Band Resistance for Strength vs Mobility
Strength
Use resistance that makes the target rep range challenging.
Mobility
Use lighter tension that helps guide movement without forcing it.
Using the heaviest possible band for mobility is usually counterproductive.
Band Resistance for Warm-Ups
The goal is preparation, not fatigue.
Use light resistance.
If the warm-up causes the target muscles to feel exhausted before training begins, reduce:
- volume;
- resistance.
Band Resistance for Pull-Ups
Use the least assistance that allows:
- controlled repetitions.
A very heavy band can make the movement easy enough that strength development becomes less specific.
Band Resistance for Glute Exercises
Choose enough tension to challenge:
- hip movement;
without compromising:
- knee;
- foot alignment.
Resistance-Band Buying Checklist
Before purchasing, ask:
1. What exercises do I want to perform?
This determines band type.
2. Do I need mini bands, long loops or tube bands?
Do not buy based only on a large set count.
3. Do I need several resistance levels?
Usually yes.
4. Are the resistance values clearly described?
Colour alone is not enough.
5. Is the material latex or latex-free?
Important for allergies.
6. Are the bands wide enough to feel comfortable?
Especially mini bands.
7. Are long bands long enough for my height and exercises?
Check dimensions.
8. Is the material suitable for repeated stretching?
Durability matters.
9. Is there a safe anchor system?
Essential for rows and presses.
10. Are handles and cuffs securely stitched?
Important for tube systems.
11. Are the carabiners robust?
Avoid cheap decorative hardware.
12. Are replacement bands available?
Useful when individual bands wear out.
13. Can I clean and store them easily?
Especially fabric bands.
14. Is the set suitable for progressive training?
You should not outgrow every band immediately.
15. Does the manufacturer provide maximum-stretch guidance?
Useful for safety.
How to Test Resistance Bands Before Buying
If possible:
Check Stretch
The band should stretch smoothly.
Inspect Surface
Look for:
- cracks;
- uneven thickness.
Check Handles
Pull gently against attachments.
Inspect Stitching
Especially around:
- cuffs;
- handles.
Check Comfort
Place mini bands around:
- thighs.
They should not feel excessively narrow or sharp.
A Simple Choice by Goal
General Home Strength
Choose:
long loop band set
Lower-Body Glute Work
Choose:
mini loop bands, ideally fabric or high-quality latex
Cable-Style Exercises
Choose:
tube bands with handles + door anchor
Mobility
Choose:
light long flat bands
Pull-Up Assistance
Choose:
long loop bands in several resistance levels
Travel
Choose:
long loop + mini-band set
A Simple Choice by Material
Maximum Elasticity
Latex.
Latex-Free Requirement
Synthetic rubber or specifically labelled latex-free material.
Lower-Body Comfort
Fabric.
A Simple Choice by Resistance
Beginner
Light + medium + heavy.
Strength-Oriented User
Include heavier long loops.
Mobility User
Prioritize light resistances.
Pull-Up Training
Include several assistance levels.
A Simple Choice by Home Space
Tiny Apartment
Long-loop band set.
Small Home Gym
Bands + dumbbells.
Full Home Gym
Bands as accessory tools alongside:
- barbell;
- dumbbells;
- rack.
A Simple Choice for Beginners
A practical beginner set includes:
- light long loop;
- medium long loop;
- heavy long loop;
- mini-band set.
Add a:
- door anchor;
only if you plan to use anchored exercises.
You do not need a 20-piece set containing several accessories you will never use.
A Simple Choice for Strength Training
Prioritize:
- durable long-loop bands;
- broad resistance range;
- secure anchors.
Use them for:
- rows;
- presses;
- squats;
- hinges;
- accessory work.
A Simple Choice for Mobility
Prioritize:
- long;
- light;
- easily controlled bands.
You need range and comfort more than maximum resistance.
A Simple Choice for Pull-Ups
Buy at least:
- heavy;
- medium;
- light assistance bands.
This lets you gradually reduce assistance.
Common Resistance-Band Buying Mistakes
Buying Only One Resistance
Too limiting.
Choosing Bands Based Only on Colour
Colours are not standardized.
Buying Extremely Cheap Bands With Uneven Material
Failure risk may be higher.
Buying Fabric Hip Bands for Full-Body Training
They are too specialized.
Buying Tube Bands Without Checking Hardware
Carabiners and stitching matter.
Ignoring Latex Allergy
Check materials.
Buying Heavy Bands Without Light Options
Small-muscle exercises need less resistance.
Ignoring Band Length
Tall users may need more stretch.
Choosing a Huge Set for Quantity Rather Than Quality
Most users need only a few good bands.
Common Resistance-Band Training Mistakes
Overstretching the Band
Use a stronger band instead.
Anchoring to Weak Furniture
The anchor can fail.
Training With Damaged Bands
Replace them.
Letting the Band Snap Back
Control the eccentric phase.
Using Too Much Resistance for Shoulder Exercises
Small muscles often need lighter bands.
Standing Too Far From the Anchor
Can create excessive pre-tension.
Using a Strong Band to Force Mobility
Mobility should not be painful.
Leaving Bands in a Hot Car
Heat degrades material.
Leaving Fabric Bands Damp
Dry them.
Assuming Band Resistance Equals Dumbbell Weight
It does not.
How to Choose Resistance Bands Step by Step
Step 1 — Define Your Main Use
Strength, pull-ups, mobility, glute work or travel?
Step 2 — Choose the Band Type
Mini, long loop, flat or tube?
Step 3 — Buy Multiple Resistance Levels
At least:
- light;
- medium;
- heavy;
for general training.
Step 4 — Check Material
Latex, synthetic or fabric?
Step 5 — Check Dimensions
Length and width matter.
Step 6 — Evaluate Handles and Anchors
If applicable.
Step 7 — Inspect Safety and Construction
Look for:
- uniform material;
- reinforced stitching;
- quality hardware.
Step 8 — Plan Progression
Can you move from lighter to heavier bands?
Step 9 — Consider Cleaning and Storage
Especially for frequent use.
Step 10 — Buy Based on Function, Not Set Size
Three excellent bands may be more useful than:
- 15 poor-quality accessories.
When Should You Replace Resistance Bands?
Replace a band when you notice:
- visible tears;
- cracks;
- thinning;
- significant fraying;
- exposed elastic;
- damaged handles;
- failing stitching;
- permanently distorted sections.
Do not wait for it to:
- snap.
How Long Do Resistance Bands Last?
There is no fixed lifespan.
Durability depends on:
- material;
- frequency;
- stretch;
- environment;
- storage.
A frequently used pull-up band may wear much faster than a light mobility band.
Inspect regularly.
When Should You Seek Professional Guidance?
Professional input can be useful if you are using bands for:
- injury rehabilitation;
- post-surgical recovery;
- significant joint pain;
- neurological or mobility limitations.
A physiotherapist or appropriate clinician can help determine:
- resistance;
- movement;
- progression.
Bands are simple equipment, but the correct exercise still matters.
The Physical Glow Takeaway
Resistance bands are one of the most practical ways to add strength and mobility training to a home routine because they are:
- compact;
- inexpensive;
- adaptable;
- easy to transport.
But different band types serve different purposes.
For most users:
- mini bands → hip and lower-body accessory exercises;
- fabric bands → comfortable glute-focused training;
- long loop bands → the most versatile option for full-body strength, pull-up assistance and mobility;
- flat therapy bands → lighter mobility and rehabilitation-style work;
- tube bands with handles → cable-style home exercises.
Choose several resistance levels rather than trying to use one band for everything.
A practical set should let you use:
- light resistance → shoulder work and mobility;
- medium resistance → rows, presses and general strength;
- heavy resistance → lower-body exercises and pull-up assistance.
Then focus on construction and safety:
- uniform elastic material → predictable tension;
- appropriate length and width → better exercise range;
- secure handles and cuffs → essential for tube systems;
- strong anchors → critical for anchored exercises;
- smooth attachment surfaces → reduce abrasion;
- regular inspection → helps identify damage before a band snaps.
Do not interpret a band labelled:
- “20 kg”;
- “40 lb”;
as equivalent to lifting that exact amount with a dumbbell.
Elastic resistance changes as the band stretches.
Instead, judge the band by whether it allows you to perform the exercise with:
controlled technique → appropriate range → challenging repetitions → room for progression.
And treat band condition seriously.
Before high-tension exercises:
inspect the band → inspect the anchor → confirm the setup → then train.
A small resistance-band collection can support everything from:
- travel workouts;
- beginner strength sessions;
- assisted pull-ups;
- mobility drills;
- accessory training.
For many home users, the simplest useful setup is:
a light, medium and heavy long-loop band + a small mini-band set.
That small collection can provide years of useful training when combined with sensible progression and proper care.